ActionScript 3.0을 공부하기위한 가장 기본적으로, 항상 참고해야할 사이트 입니다.
ActionScript Technology Center
http://www.adobe.com/devnet/actionscript/

레퍼런스
http://help.adobe.com/en_US/AS3LCR/Flash_10.0/

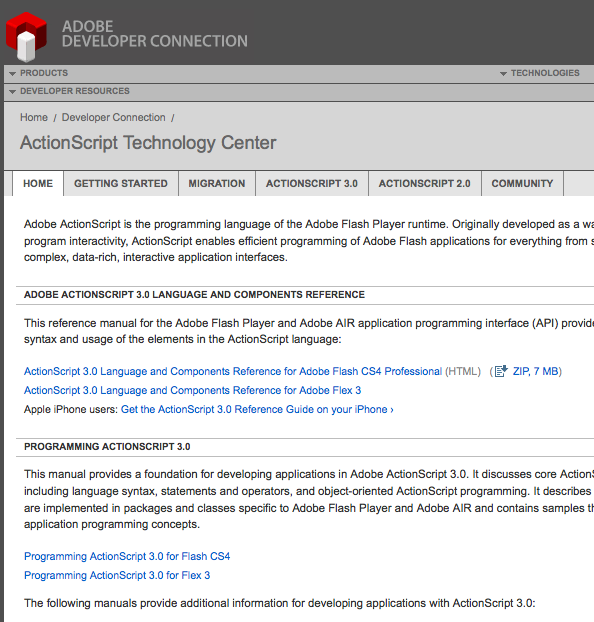
페이지를 보시면 다음과 같이 레퍼런스와 Programming 가이드 문서가 있습니다.
한글 버전은 주요 Object들의 이름들까지 한글로 번역을 해놓아서 오히려 혼돈의 우려가 있더군요.
(예:Display Object - 표시객체)
따라서, 영문문서를 보는것이 좋습니다. 아래와 같이 문서들이 있습니다.


일단은 Flash 를 기준으로 스터디를 하기 위해 Flash용 문서를 받아 보시면 됩니다.
(ActionScript 에 대한 내용은 기본적으로 같습니다.)

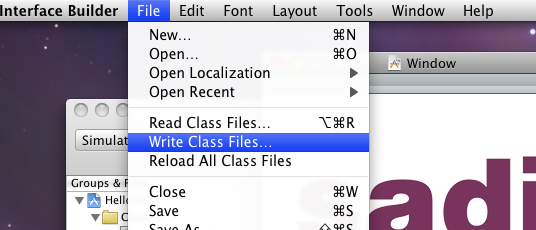
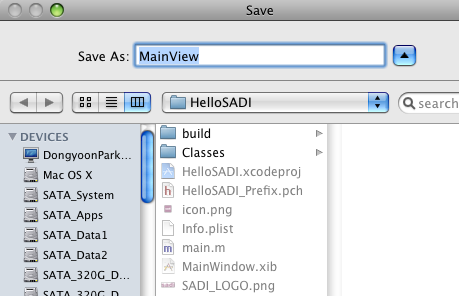
해당 페이지로 들어가셔서 우측 상단을 보시면 PDF 로 다운로드 받을 수 있는 메뉴가 있습니다.
PDF 로 저장해놓고 수시로 볼 수 있는게 좋겠죠.


AS3.0 의 주요 특징
- ActionScript 3.0 goes beyond the scripting capabilities of previous versions of ActionScript. It is designed to facilitate the creation of highly complex applications with large data sets and object-oriented, reusable code bases.
- 새로운 버전의 ActionScript Virtual Machine2 (AVM2) 사용
- ActionScript 3.0 is architecturally and conceptually different from previous versions of ActionScript.
- A single SWF file cannot combine ActionScript 1.0 or 2.0 code with ActionScript 3.0 code.

AS2.0 과의 표면적인 차이점
완전한 프로그래밍 언어의 성격을 갖추면서 변수의 타입을 명확하게 명시를 해주어야 합니다.
기존처럼 타임라인 여기저기서 무비클립등에다가 임의로 이름만 써서 변수를 만들던 방식은 이제 통용불가!

다음과 같이 변수 선언시 var 를 붙이고, 변수이름 뒤에는 : 와 타입명을 명시해주어야 함.
var myNumber:Number = 17;
var myString:String = "Hello SADI";


class (클래스) 와 object (객체) 그리고 instance(인스턴스) 개념
AS3.0 이 Object Oriented Programming 을 지향하면서 이들의 개념도 알아야 제대로 다룰 수 있게 되었습니다.
이들은 Processing 이나 Java 에 등장하는 class 와 같습니다.

Two words that are often used as synonyms for data type are class and object. A class is simply the definition of a data type—it’s like a template for all objects of the data type, like saying “all variables of the Example data type have these characteristics: A, B, and C.” An object, on the other hand, is just an actual instance of a class; a variable whose data type is MovieClip could be described as a MovieClip object. The following are different ways of saying the same thing:

•The data type of the variable myVariable is Number.
•The variable myVariable is a Number instance.
•The variable myVariable is a Number object.
•The variable myVariable is an instance of the Number class.

즉 class 는 붕어빵 틀과 같은 틀을 말하고 object 나 instance 라는 말은 실제로 찍어낸 붕어빵들을 말합니다.
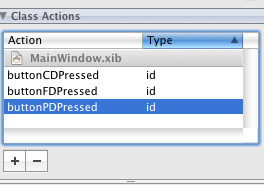
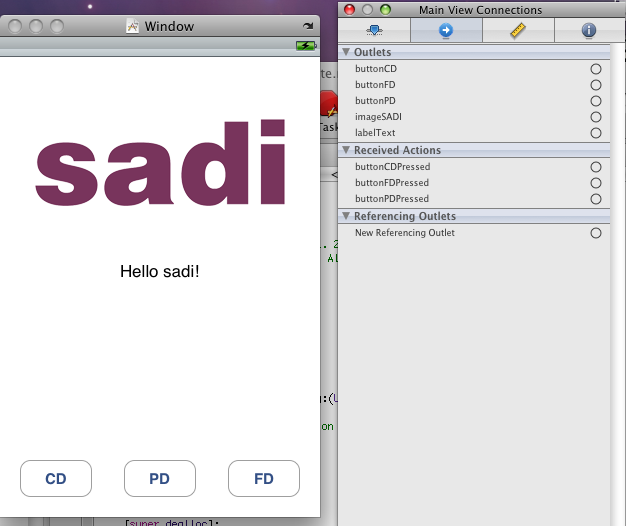
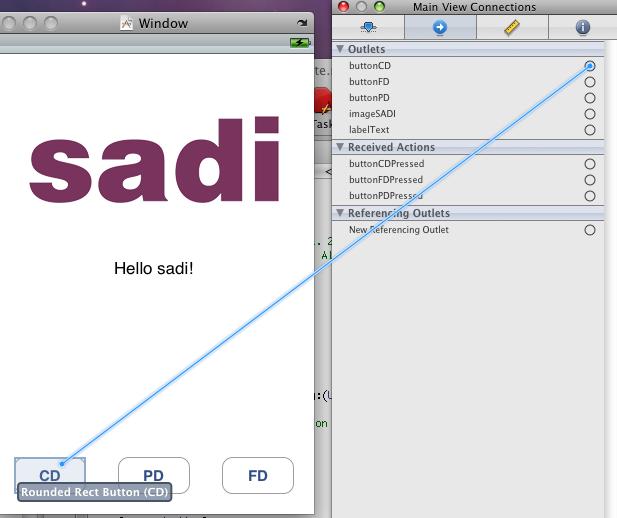
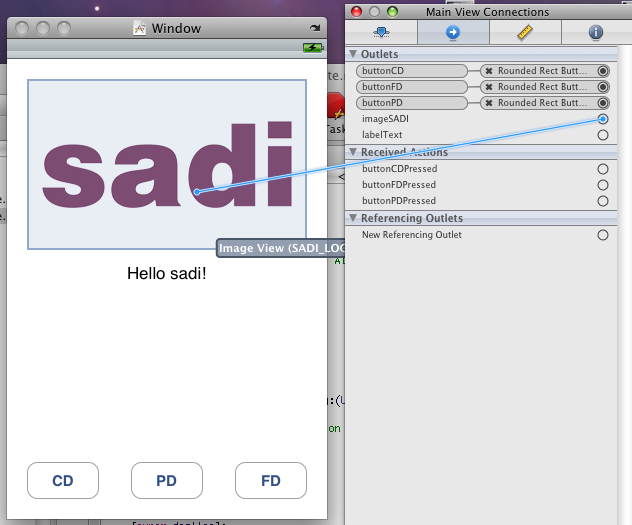
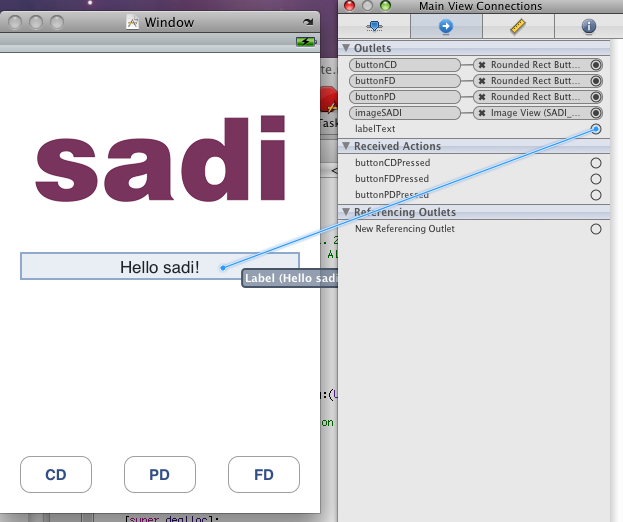
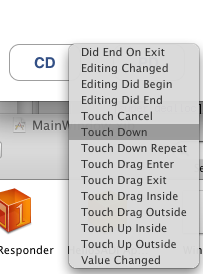
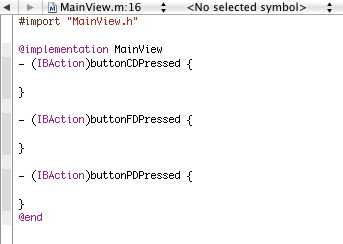
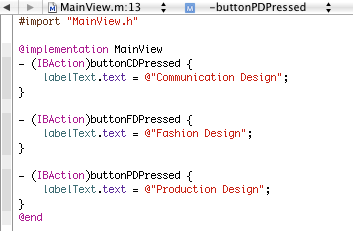
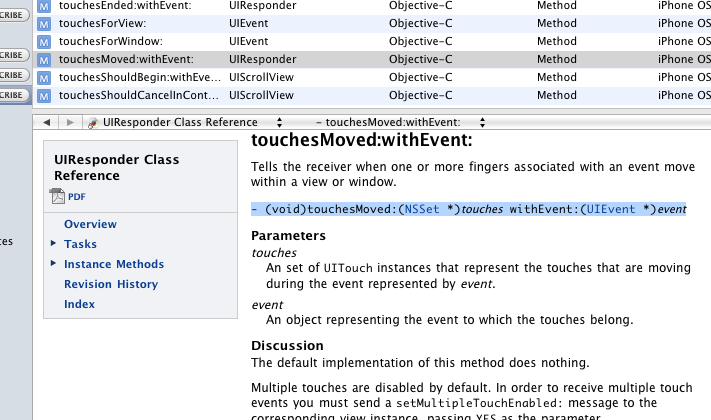
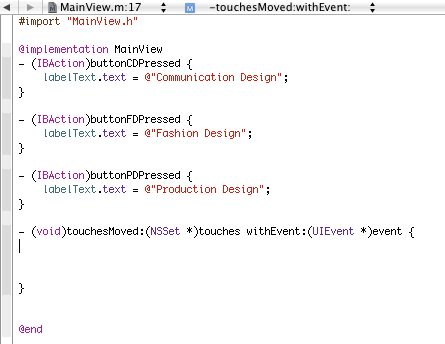

이벤트 핸들링
AS3.0 에서는 다음과같이 이벤트 리스너 메소드(=함수) 를 만들어놓고, addEventListener 라는 함수로 등록을 해줍니다.

function myEventResponse(event:MouseEvent):void
{
// myButton 이 클릭되었을때 실행할 동작 구현...
}

myButton.addEventListener(MouseEvent.CLICK, myEventResponse);


DisplayObject 계층구조 (신명용 강사님의 세미나 자료 내용)
AS3.0 으로 Flash 를 제대로 다루려면, 다음 구조를 정확히 알고있어야 합니다.

MovieClip Inheritance Sprite Inheritance DisplayObjectContainer Inheritance InteractiveObject Inheritance DisplayObject Inheritance EventDispatcher Inheritance Object

Object  최상위 객체 - 모든 클래스는 Object를 상속
EventDispatcher
 이벤트 발생기
 addEventListner(이벤트타입, 리스너함수);
 removeEventListener(이벤트타입, 리스너함수);
 dispatchEvent(이벤트)
DisplayObject
 눈에 보이는 객체 : Graphics, Bitmap, Shape
 x, y, width, height, alpha, rotation, visible,
 mouseX, mouseY, scaleX, scaleY
 (AS1.0에서는 속성들 앞에 _ 가 붙었으나 이젠 붙이지 않음)
InteractiveObject
 사용자에 반응하는 객체
 SimpleButton, TextField
DisplayObjectContainer
 다른 객체를 포함할 수 있는 객체 (Sprite, Stage, Loader)
 담긴객체 : child, 담는객체 : parent, 깊이 : index
 mouseChildren, numChildren, tabChildren
 contains(), addChild(), addChildAt(), removeChild(),
 removeChildAt(), getChildIndex(), getChildAt(),
 setChildIndex()
Sprite
 프레임이 없는 무비클립
 buttonMode, graphics, hitArea, soundTransform ...
 startDrag(), stopDrag()
MovieClip
 프레임을 가진 Sprite


Posted by 알 수 없는 사용자
안녕하세요 박동윤입니다. 
지난 1월24일에 진행했던 세미나를 정리해드립니다. 천천히 다시 보시면 도움 되실겁니다 ^^
설명드렸던 간단한 터치 어플리케이션에 대한 제작 과정 설명입니다.

ADC 가입, SDK 및 문서 받기, iPhone Developer Program 등에 대한 것은 앞선 글을 참고하세요
(메일로 보내드렸던 글입니다)

1. Xcode 실행 및 프로젝트 생성


File - New Project 에서 Window-Based Application 을 선택합니다.
저희는 Windows 만 생성된 맨바탕에 View를 만들고 요소들을 추가할 예정입니다.

프로젝트 이름은 HelloSADI 와 같이 원하는 이름을 적어주시면 됩니다.
위치도 데스크탑이나 원하는 폴더에 저장하시면 됩니다.


다음 두개의 png 파일을 데스크탑에 저장하시고


프로젝트의 Resources 폴더에서 오른쪽클릭, Add - Existing Files 를 선택하셔서 추가해 줍니다.
이때 Copy items into destination group's folder 를 체크하셔서 프로젝트 폴더로 복사가 되도록 합니다.


2. 인터페이스 빌더 실행하기

프로젝트 파일들 중 Resources 의 MainWindow.xib 파일이 인터페이스 빌더(Interface Builder)의 파일입니다.
더블클릭하시면 인터페이스 빌더가 실행됩니다.


3. UI 구현

Interface Builder 가 실행되면 다음과 같은 네개의 창이 보입니다.
Inspector 가 안보이시면 Toos - Inspector 를 선택하여 보이도록 합니다.


UI요소들중 제일먼저 View 를 끌어다 화면 꽉차게 놓습니다. 이 View 가 바탕이 되는 View 이고,
다른 View 들을 담게 됩니다.

그리고, Inspector 창에서 다음과 같이 네번째 탭(identity) 을 보시면 Class 에 UIView라고 적혀있습니다.
이걸 적절한 이름으로 바꿔줍니다. 저의경우는 MainView 라고 하겠습니다.


이제 UIView 를 바탕에 깔았으므로 UI요소들을 넣겠습니다.
sadi 로고를 담기위해 Image view 를 끌어다 놓고 적당한 크기로 조절합니다.


Inspector 창은 왼쪽 창에서 선택된 UI 요소들에 대한 정보를 보여줍니다.
Image View 가 선택된 상태에서 Inspector 의 첫번째 탭 (Attributes)를 눌러 Image 의 목록을 펼쳐
sadi logo 의 png파일을 선택해 줍니다.


이번엔 Label 을 끌어다 놓고 화면 양끝에 적절한 길이로 늘여 배치를 하고 역시 Attribute 에서 가운데정렬로 바꿔줍니다.


이 Label을 더블클릭하면 텍스트를 바꿀 수 있는데, Hello sadi! 라고 입력하겠습니다.


같은 방법으로, Round Rect Button 을 끌어다 화면 아랫쪽에 배치합니다.
세개를 배치하시고, 버튼을 더블클릭하면 버튼의 텍스트를 입력할 수 있는데
CD, PD, FD 라고 각각 입력하겠습니다.


저장 (File-save)하시고, Xcode 로가셔서 Build and Go 를 눌러 실행해 봅니다.


구성한 UI 요소들이 잘 보입니다. 단 버튼들을 눌러도 아무 인터렉션은 없습니다.
지금 우리는 단지 껍데기만 만들어 놓은 것에 불과하니까요.
이제 무언가 인터렉션이 있도록 하려면 그러한 코드를 작성해서 연결을 해주면 되겠죠?

글이 길어져서 2부로 나누었습니다. 다음글로 이동하세요~

Posted by 알 수 없는 사용자

4. Code 와의 연결

 
다른 프로그램/언어들도 그렇듯이 우리가 배치한 요소들(이미지, 텍스트레이블, 버튼)들을
제어하고 변화를 주기위해서 이들을 담기위한 변수(?)를 만들어 줍니다.

위의 UI 요소들은 Interface builder (이하 IB라고 부르겠습니다)를 사용하지 않고 순수히 코딩으로만 가능하지만,
우리는 IB를 사용하여 만들었으므로, IB에서 실제 코드와 연결될때 매칭될 변수 정보를 만들어주어야 합니다.

인터페이스 빌더에서 화면의 흰바탕(MainView)를 클릭해서 Inspector 창에 Main View 의 identity 가 나타나도록
합니다. (다른 UI요소를 클릭하면 해당 요소의 identity 가 나오므로 주의)


Class Outlets 에서 + 를 눌러 다음과 같이 추가합니다. 버튼세개와 sadi 로고 이미지, 텍스트레이블에 대한
변수들 입니다. 따라서 이름은 마음대로 하셔도 됩니다. 단 Type 은 int, char, float 와 같은 변수의 타입이므로
알맞게 해당 타입을 적어주셔야 합니다.


다음에는 Class Actions 에서 다음과같이 각 버튼이 눌렸을때 불려질 함수명를 적어줍니다.
역시 이름은 마음대로 하셔도 됩니다. 타입은 id로 놔둡니다.


최종적으로 다음과 같은 화면입니다.


이제는 우리가 작성한 변수들을 각 UI요소들과 연결 해주면 됩니다.
두번째 탭 (Connections)를 클릭해보면 다음과 같이 우리가 작성한 변수와 함수(Action)들이 목록에 나타나 있습니다.


각 변수의 우측에 동그라미가 달려있는데, 이것을 클릭한채로 드래그 하셔서 해당 UI요소에 연결해 줍니다.


Action의 경우도 해당 버튼에 연결해주면 되는데, 이때 버튼의 어떤 경우에 불리게 할 것인지 메뉴가 뜹니다.
우리는 터치가 되었을때 Action 이불리도록 할 것이므로 Touch Down 을 선택해 줍니다.


모두 연결하면 다음과 같습니다.


이제 UI요소 배치, 변수 작성, 1:1 연결까지 다 마쳤으므로 실제 코드 생성을 하면 됩니다.
File - Save 하셔서 한번 저장을 일단 해주시고,
File - Write Class Files 를 눌러 실제 클래스파일을 생성합니다.


다음과 같이 우리가 이름지었던 MainView 라는 이름으로 저장이 됩니다.
(혹시 UIWindow 나 엉뚱한 이름이 나오면 화면에서 흰바탕 MainView 가 아닌 다른 요소가 선택된
상태로 Write Class 파일을 눌러서 그렇습니다.)


다음과 같은 물음이 나오는데, 물론 프로젝트에 파일을 추가할 것이므로 체크를 하고 Add 합니다.


이제 Interface Builder 에서 할일은 끝났습니다. 종료하시고 Xcode 로 갑니다.
다음과 같이 생성된 MainView.h 와 MainView.m 파일이 잘 들어와 있습니다.


5. Code 작성

우선 MainView.h 파일을 보면 다음과같이 되어있습니다.
IB에서 작성했던 변수들과 함수명들이 잘 들어와있습니다.
단, 우리가 UIView 를 MainView 로 이름을 바꾸었으므로, UIView 를 상속하도록 수정을 해야합니다.


MainView : 다음의 주석부분을 지우고 다음과 같이 UIView 로 고쳐줍니다.


이제 MainView.m 파일로 가보면 다음과 같이 우리가 정의해놓은, 각 버튼이 눌렸을때
불릴 함수들이 있습니다. 이제 기능을 구현해 넣으면 되겠죠.


다음과 같이 각 버튼이 눌렸을때 텍스트 label 에 텍스트를 표시하도록 합니다.
labelText.text 와 같은 모양은 플래시의 액션스크립트나 프로세싱에서도
많이 보아오셨던 것이라 쉽게 이해하실 수 있을겁니다.
특이한 점이라면, 문자열앞에 골벵이 @를 붙여야 합니다. (문서들 참조)


이제 Build and Go를 눌러 실행해 봅니다.


각 버튼을 누르면 해당 텍스트가 잘 표시 됩니다.

마지막으로 터치기능을 추가해 sadi 로고를 손가락으로 움직여 보겠습니다.
Xcode 의 Help 메뉴에서 Documentation 을 선택합니다.


우측 상단의 검색창에서 Touches 라고 쳐보면 다음과같이 터치관련 API 가 여러개 나옵니다.


우리는 터치된 손가락을 움직일때 이미지가 따라서 움직이게 할 것이므로 touchesMoved 를 선택합니다.
선택해서 나온 설명에서 바로 보이는 함수명
- (void)touchesMoved:(NSSet *)touches withEvent:(UIEvent *)event
을 그대로 긁어서 복사합니다.


그리고 Xcode 로가서 우리의 MainView.m 파일에 다음과 같이 붙여넣기 한후
괄호를 열고 닫아서 함수로 만들어 줍니다. { }
즉 터치 이벤트가 일어나면 시스템(iPhone OS)에서 이 함수를 불러주는 것이므로, 우리가 이 함수안에
무언가 기능을 만들어 놓으면, 터치가 될때마다 그 기능이 실행이 되겠지요.


위의 touchesMoved 함수안에 다음과 같이 내용을 구현합니다. (복사해서 붙여넣으세요)
단, imageSADI 는 자신이 정한 sadi logo 이미지에 대한 변수이름으로 바꿔주셔야겠죠?

- (void)touchesMoved:(NSSet *)touches withEvent:(UIEvent *)event {

    for (UITouch *touch in touches) {
        if (CGRectContainsPoint([imageSADI frame], [touch locationInView:self])) {
            imageSADI.center = [touch locationInView:self];
        }
    }
}

내용을 보면 touchesMoved라는 함수가 불려질때 touches 라는 오브젝트 안에 터치에 대한
좌표등의 정보가 들어있습니다. 이때 for 문으로 각 touch 정보들을 꺼내서
우리는 imageSADI 의 frame (이미지 크기라고 이해하면 됩니다) 안에 touch의 좌표가
들어 있는가를 판단해서 있다면 터치가 이미지 크기 안에서 이루어 진 것이므로
이미지의 center 좌표를 터치좌표로 대치한다는 내용입니다.

이것이 손가락이 움직일때 반복적으로 불리고 이미지좌표가 터치좌표로 덮어써지므로
드래그가 되는것 처럼 보이겠죠.


이미지를 터치해서 움직여보면 잘 따라 다닙니다.

*아이콘 파일 지정
Resources 폴더에 보시면 Info.plist 라는 파일이 있습니다. 여기서 Icon file 의 값을 icon.png 로 주시면 됩니다.


이외에 메모리 관리를 위한 처리를 해주어야 하는 부분이 추가적으로 있습니다만
일단은 여기까지로 마무리 하도록 하겠습니다.

다른 UI요소 (Slider)를 추가하고 이미지의 알파값을 바꿔보는 것 까지 했었습니다만,
그부분은 다음시간에 한번 다시 간단하게 같이 해보도록 하겠습니다.

수고하셨습니다 ^^


Posted by 알 수 없는 사용자
Overview
1.preprocessing
     (Data is always dirty, and once you’ve found your data set, you’ll need to clean it up.)
2.Loading the Data (Acquire and Parse)
     (A single location will be defined using a second class named Place.)
3.Drawing a Scatterplot of Zip Codes (Mine and Represent)
     (After parsing your data, you must give some consideration to how the data is mapped to the screen.)
4.Highlighting Points While Typing (Refine and Interact)
     (the focus is now to add interaction so that users can explore how the postal codes relate to          
     geography./The refinement stage begins with choosing a set of colors.)
5.Show the Currently Selected Point (Refine)
    (we’ll show the location of a fully typedout, five-digit zip code as a rectangle and add text to its    
     upper-right corner that names the location.)
6.Progressively Dimming and Brightening Points (Refine)
     (a class called ColorIntegrator does the same, but interpolates between two colors. Instead of a    
     float, the ColorIntegrator.target( ) method takes a color.)
7.Zooming In (Interact)
     (the crux of the representation is the map( ) function, which remaps a series of coordinates (with a   
      predefined range) to a specific location on the screen (with a new range))
8.Changing How Points Are Drawn When Zooming (Refine)
     (points should become larger as more digits are typed.)
9.Deployment Issues (Acquire and Refine)
     ( A better alternative is to use the built-in Thread class to load the data asynchronously.)
10.Next Steps
     (several directions in which to take this project.)

Detail
1.DBF file을 받아 데이터를 정리하는 방법
1차 DBF->excel/open office 로 열기->CSV,TSV로 저장->
2차 ->PROCESSING+FITS+CSV(TSV) WITH 8 ISSUES->최종결과치->최종 CLEANED FILE 얻기

2,새로운 텝을 열어 place class를 만들기
pasing을 위해 readData( ) parseInfo( )parsePlace( ) method 이용하기
readData( )->데이터 읽어들이기
parseInfo( )->데이터 파일의 첫번째 single line 분석 with comma (파일개수/위도,경도의 최대 최소값)
parsePlace( )->나머지 single line 분석 with tap

3.map()을 이용하여 stage 내 특정 영역에 데이터 뿌리기

4.입력 텍스트와 관련한 변수,method, array 지정/ keypress handling /depth 와 color를 입력 텍스트 상태에 따라서 match 시키기

char typedChars[] = new char[5];  letters typed
int typedCount; number of digits entered.
float messageX, messageY;  location where the text should...
int foundCount; number of locations currently selected.

keyPressed( )

typedPartials[typedCount]
입력되는 코드들을 10으로 나누고 그 몫을 취하여 인식하도록 함
for (int j = typedCount-1; j > 0; --j) {
typedPartials[j] = typedPartials[j + 1] / 10;
}

int partial[];
int matchDepth;

check()

5.default로 chosen을 null시키고 null이 되지 않았을 때 선택된 점들을 rect()로 그려주는 코드 지정
최종 셀렉트 된 point와 일치하는 지점 위에 텍스트가 위치하는 방식 정의
외곽 등에 존재하는 놈들은 이상하게 보이지 않도록  additional rule 지정


6.입력값과 정확하게 match되는 point만 highlight(target=highlight color) 해주고 나머지는 모두 dimmed(target=unhighlight color) 시키기


7. zoom 상태에 따라서 remap하기
When zoom is not enabled, the horizontal coordinate of a location
on screen is calculated by using map( ) to convert the value from the range minX
to maxX into the range mapX1 to mapX2. When zooming, we replace minX and maxX with
the minimum and maximum values that we want to be visible onscreen.

if (zoomEnabled) {
return map(x, zoomX1.value, zoomX2.value, mapX1, mapX2);
} else {
return map(x, minX, maxX, mapX1, mapX2);
}


void calcZoom( ) {
}

8.depth에 따라서 점의 크기가 변함.


9.온라인 상의 효율성을 증가시키기 위해 data를 load하는 것을 별도 class로 만들기

class Slurper{
public void run( ) {
}
 }

void readData( ) {
new Slurper( );
}

10.next stap
이번 쳅터의 시스템을 기본으로 하여 그 밖의 다양한 데이터 및 방식으로 접근할 수 있습니다.
Germany and the UK 의 zip code
town names/migration patterns
street names
area codes
other questions
additional data sets—whether satellite photography, geographicboundaries, interstate highways,
or map images.


그리고..have fun!!!!!!!!!...이라네요..^^;
Posted by chacolina

Chapter 4. Time Series
• Acquiring a table of data from a text file
• Parsing the contents of the file into a usable data structure
• Calculating the boundaries of the data to facilitate representation
• Finding a suitable representation and considering alternatives
• Refining the representation with consideration for placement, type, line weight, and color
• Providing a means of interacting with the data so that we can compare variables
  against one another or against the average of the whole data set

• 데이터 구간설정을 위해 읽어들인 데이터의 최대/최소를 구하는 방법, MIN_FLOT, MAX_FLOAT
• 읽어들인 데이터를 map을 사용하여 디스플레이의 플롯(plot)에 매핑하기
• Labeling
• createFont() 를 이용한 시스템 폰트 사용
• 키보드 입력을 통한 화면 전환
• Too many labels make the diagram look like graph paper, and too few suggests that
   only the minimum and maximum values need to be shown.


• % 연산자 (modulo : 나누기 나머지 구하기) - 반복적인 무언가를 할때 활용 가능 
   if (data % 7 == 0) {
           // 여기서 무언가 할일 작성 하면 7의 간격으로 실행됨
   }

• Grid 를 제공하여 가독성 높이기
• Vertex 사용하기
       beginShape( );
       vertex(10, 10);
       vertex(90, 30);
       vertex(40, 90);
       vertex(50, 40);
       endShape();    -> endShape(CLOSE); 하면 구간이 닫히고 면적으로 표시됨

• 특정 점에서 Mouse rollover 사용하기 - dist 활용
       if (dist(mouseX, mouseY, x, y) < 3) {
               // rollover 시 동작 작성
       }


• Integrator class 를 이용한 부드러운 데이터 전환
Posted by 알 수 없는 사용자

Chapter 1. The Seven Stages of Visualizing Data
- characteristics of a data set
- data is a moving target
- Great information visualization never starts from the standpoint of the data set; it starts with questions. 
   Why was the data collected, what’s interesting about it, and what stories can it tell?

   The most important part of understanding data is identifying the question that you want to answer.
- The more specific you can make your question, the more specific and clear the visual result will be.
- Proper visualization is a kind of narrative, providing a clear answer to a question without extraneous
   details.
- Each Project Has Unique Requirements
- Who is your audience? What are their goals when approaching a visualization?

Chapter 3. Mapping
- 외부에서 데이터를 읽어들이고, 가공하고, 목적에 맞게 사용하는 과정을 공부했습니다.
   여기서는 .tsv 라는 저자가 직접 만든 데이터 파일을 다루었고, 우리가 앞으로 주로 다룰 데이터는 이렇게 
   컴퓨터에 파일로 있는것도 있을 수 있지만, 음악파일, 책 텍스트파일 등을 비롯해 인터넷상에서 얻어지는
   데이터들, XML 형식 등 무궁무진하게 다양합니다.
   그러나 DB이던 파일이던 XML 이던 데이터 형식이 어떻든 간에, 우리는 일단 최초에 할일이 읽어들일 
   데이터를 우리의 목적에 맞게 잘라내고 가공해야 한다는 건 공통적입니다.

- 데이터베이스(Database) 와 클래스(Class)에 관한 간략한 설명.
- 이 챕터에서는 저자가 작성해놓은 Table 이라는 데이터를 모델링한 class를 사용하여 데이터를 저장/관리.
- 데이터를 가공할때 자주쓰는 주요 함수(function) 를 공부함
   map / norm / lerpColor
- 음/양 부호와 크기를 가지는 데이터를 효과적으로 표현하기 위한 여러가지 방법 시도(크기, 색, 투명도 등등)
- 마우스를 통한 사용자 interaction 요소 추가
- 수치 표시할때 자주쓰는 함수 공부 (자리수)
   nf / nfp
- 저자가 만든 Integrator 라는 class 를 활용하여 좀더 값이 부드럽게 변하도록 시도 
  (이 클래스도 다른곳에서 활용 가능할듯)

Homework
- 각자 Flickr 의 API 사이트를 방문에서 어떤 종류의 프로그램언어로 API 를 제공하고 있고, 제공하는 
   데이터의 모양은 어떻게 생겼는지 알아보기.
   주소 http://www.flickr.com/services/api/

- 이번 챕터에 나왔던 Processing 코드들 실행해보고 이해하기.
Posted by 알 수 없는 사용자
혹시 해결 방법을 하시는분은 좀 알려주세요.
사용자 삽입 이미지
이렇게 해서 마우스 좌우로 움직이는 값을 계산해서 오른쪽으로 70이상으로 빠르게 움직이면
무비가 플레이 돼도록 해놨는데 해결해야 하는 부분이 무비가 한번 다 돌아가지 않으면 다시 신호가 들어오지 않게 하려는데 어떻게 하는지 잘 모르겠어요.

그러니까 Paper라는 무비가 끝나지도 않았는데 다시 신호가 들어와서 첫프레임으로 가는게 아니라 무비가 플레이 돼고 있을 때에는 아무리 마우스를 움직여도 무비가 첫프레임이 돼지 않게요.. 암턴 아시는분은 좀 알려주세요~~!!
Posted by 알 수 없는 사용자
아시다시피 Processing 의 영상처리 기반이 Quicktime 을 기반으로 하여 Mac 이 아닌
PC Windows 환경에서 캠과 연동하기가 상당히 어려웠습니다.
(WinVDig 등 추가 설치, 잦은 오류, 느린 프레임 등)
Mac 용 웹캠은 단종되어 구하기가 어려운 iSight 이외에 별로 없다는 문제도 있고요.

한편, JMyron의 최근 버전에서는 이러한 WinVDig 등이 필요없이 연동이 된다고 하여
해보니 잘 됩니다. (중국산 만오천원짜리 웹캠으로 해봤습니다만, 잘 되는군요)

Download
http://webcamxtra.sourceforge.net/download.shtml

JMyron 활용
- 이전 작성한 글 참조

설치
- 다운로드받아 압축을 풀면 다음과 같습니다.

사용자 삽입 이미지


위 폴더들중 JMyron 폴더를 Processing 의 libraries 폴더에 넣으시고
Extra DLLs 의 두개의 .dll 파일을 Windows 의 system32 폴더에 넣으시면 됩니다.


Posted by 알 수 없는 사용자

Download
http://webcamxtra.sourceforge.net/download.shtml


Reference
http://webcamxtra.sourceforge.net/reference.shtml


JMyron 활용
- Motion detection
- Color tracking


다운받은 파일에 포함되어 있는 Example 들입니다.

예제 - Motion detection
frame difference (현재프레임과 다음프레임 이미지의 차이)를 이용하여 움직임을 감지해
녹색원을 그려주는 예제.
frame difference 이미지에서 검출된 여러 glob(덩어리)들의 중심좌표값들을 평균하는 방식


Myron_CameraAsMouse.pde
---------------------------------------------------------------------------------------------------
/*
the green oval is an averaged position of all the detected dark movement in the camera's view.
physical setup:
  - make sure there is a strong value contrast between your hand and a white background.
  - set all camera settings to "manual" for the most stable results.
 last tested to work in Processing 0090

 JTNIMOY
*/

import JMyron.*;

JMyron m;//a camera object

//variables to maintain the floating green circle
float objx = 160;
float objy = 120;
float objdestx = 160;
float objdesty = 120;

void setup(){
  size(640,480);

  m = new JMyron(); // JMyron 개체 생성
  m.start(width,height); // JMyron 시작
  m.trackColor(255,255,255,256*3-100); // white 를 track color 로 지정
  m.update();
  m.adaptivity(10); // frame difference 의 반응속도 설정
  m.adapt(); // 최초 시작시는 바로 adapt
  println("Myron " + m.version());
  rectMode(CENTER);
  noStroke();
}


void draw(){
  background(0);
  m.update();  //update the camera view
  drawCamera();
 
  int[][] centers = m.globCenters(); // glob 의 중심좌표 값들을 centers 라는 2차원 배열에 저장

  float avX=0;
  float avY=0;
 
  // centers 좌표를 모두 더해서 avX 와 avY에 저장
  for(int i=0;i<centers.length;i++){
    avX += centers[i][0];
    avY += centers[i][1];
  }
  // centers.length 로 나누어 평균을 구한다
  if(centers.length-1>0){
    avX/=centers.length-1;
    avY/=centers.length-1;
  }

  // 평균점을 빨간색 사각형으로 표시
  fill(255,0,0);
  rect(avX,avY,5,5);

  // 새로운 평균점을 destination 좌표에 저장
  if(!(avX==0&&avY==0)&&centers.length>0){
    objdestx = avX;
    objdesty = avY;
  }

  // 물체의 좌표를 destination 좌표로 이동 하고 녹색원을 그린다
  // (급작스럽게 튀는 이동을 방지하기위해 easing 방식 으로 더해가면서 이동)
  objx += (objdestx-objx)/5.0f;
  objy += (objdesty-objy)/5.0f;
  fill(30,100,0);
  ellipseMode(CENTER);
  ellipse(objx,objy,30,30); // 원 그리기 : 이를 대체해서 원하는 것을 그릴 수 있습니다.
}

void drawCamera(){
  // 화면에 frame difference 이미지를 그려준다
  int[] img = m.differenceImage(); //get the normal image of the camera
  loadPixels();
  for(int i=0;i<width*height;i++){ //loop through all the pixels
    pixels[i] = img[i]; //draw each pixel to the screen
  }
  updatePixels();
}


public void stop(){
  m.stop();//stop the object
  super.stop();
}


예제 - Color tracking
trackColor 함수로 지정된 컬러를 traking 하여 box들로 그려줍니다.
참고로 reference 에 보시면 trackNotColor 라는 함수도 있어서 검출을 원하지 않는 컬러도
지정이 가능한듯 합니다.


Myron_tracking.pde
---------------------------------------------------------------------------------------------------
/*

This example shows a whole lot of different
tracking methods being rendered at one time.
Don't be surprised if this one runs really slowly.

 last tested to work in Processing 0090
 
 JTNIMOY
 
*/

import JMyron.*;

JMyron m;
 
void setup(){
  int w = 640;
  int h = 480;
 
  size(w,h);
  m = new JMyron();
  m.start(640,480);
  m.findGlobs(1);
  println("Myron " + m.version());
}

void mousePressed(){
  m.settings();
}

void draw(){
  m.trackColor(180,180,120,255); // track하고자 하는 컬러 지정 (r,g,b,tolerance)

  m.update();
  int[] img = m.image();
 
  //first draw the camera view onto the screen
  loadPixels();
  for(int i=0;i<width*height;i++){
      pixels[i] = img[i];
  }
  updatePixels();
 
 
  // 마우스 포인터 영역 근처의 컬러 평균값으로 네모 그리기
  noStroke();
  int c = m.average(mouseX-20,mouseY-20,mouseX+20,mouseY+20);
  fill(red(c),green(c),blue(c));
  rect(mouseX-20,mouseY-20,40,40);

  noFill();
  int[][] a;


  // 검출된 glob 들의 중심점을 노란색으로 찍기
  a = m.globCenters();
  stroke(255,255,0);
  for(int i=0;i<a.length;i++){
    int[] p = a[i];
    point(p[0],p[1]);
    println("p[0]="+p[0]+", p[1]="+p[1]);
  }
 

  // 검출된 glob 을 사각형으로 그리기
  a = m.globBoxes();
  stroke(255,0,0);
  for(int i=0;i<a.length;i++){
    int[] b = a[i];
    rect(b[0], b[1], b[2], b[3]); // 위의 p[0],p[1] 이나 이 b[0], b[1] 등의 값들을 활용해서 작업.
  }


}

public void stop(){
  m.stop();
  super.stop();
}


Posted by 알 수 없는 사용자
Blob detection library 다운로드

http://www.v3ga.net/processing/BlobDetection/

library 설치
Procesing0135 - libraries 밑에 blobDetection 폴더 생성, 그안에 library 폴더 생성 후
그안에 다운받은 jar 파일 붙여넣기


사용자 삽입 이미지


프로세싱 실행 후 아래와 같이 Import Library 메뉴에 뜨면 성공
사용자 삽입 이미지


Blob detection 활용
크게 두가지 기능이 있음
- Blob (얼룩) 들을 잡아 외곽선 그리기 (draw edges)
- Blob 들을 잡아 사각형 그리기 (draw blobs)
- 특정 영역에 그림자(얼룩)이 침범했는지 여부는 draw blobs 의 x, y 좌표를 얻어내서 활용 하면 됨


Blob detection 샘플코드 - bd_webcam (위의 홈페이지의 download 메뉴에서 다운 가능)
간단하게 설명을 달았고, 홈페이지의 documentation 에서 자세한 내용을 볼 수 있음

import processing.video.*;
import blobDetection.*;

Capture cam;
BlobDetection theBlobDetection;
PImage img;
boolean newFrame=false;

// ==================================================
// setup()
// ==================================================
void setup()
{
    // Size of applet
    size(640, 480);
    // 카메라 비디오 입력 초기화
    cam = new Capture(this, 40*4, 30*4, 15);
    // BlobDetection
    // img which will be sent to detection (a smaller copy of the cam frame);
    // 카메라의 매 프레임을 이미지로 저장한 후 blob 분석
    // (얼룩 정도만 분별해 내면 되므로 해상도가 굳이 높을 필요가 없겠죠)

    img = new PImage(80,60);
    theBlobDetection = new BlobDetection(img.width, img.height);
    theBlobDetection.setPosDiscrimination(true); // true 면 검정부분, false면 밝은부분 감지
    theBlobDetection.setThreshold(0.1f); // 민감도 설정
}

// ==================================================
// captureEvent()
// ==================================================
void captureEvent(Capture cam)
{
    // 카메라 영상 입력 읽어서 화면에 보여주기 - 전시작업에서 주로 받아들인 영상을
    // 판별 작업만 하게되므로 나중에 이부분은 주석처리 되도 되겠죠
    cam.read();
    newFrame = true;
}

// ==================================================
// draw()
// ==================================================
void draw()
{
    if (newFrame)
    {
        newFrame=false;
        image(cam,0,0,width,height);
        img.copy(cam, 0, 0, cam.width, cam.height,
                0, 0, img.width, img.height);
        fastblur(img, 2); // 자잘한 너무 많은 blob을 완화 시켜주는 듯
        theBlobDetection.computeBlobs(img.pixels); // Blob 계산
        drawBlobsAndEdges(true,false);
    }

    // Hit test area 테스트를 위한 영역에 노란 사각형 그리기
    stroke(255,255,0);
    rectMode(CORNER);
    rect(400,350,100,100);
    rect(400,50,100,100);
}

// ==================================================
// drawBlobsAndEdges()
// ==================================================
void drawBlobsAndEdges(boolean drawBlobs, boolean drawEdges)
{
    noFill();
    Blob b;
    EdgeVertex eA,eB;
    for (int n=0 ; n<theBlobDetection.getBlobNb() ; n++)
    {
        b=theBlobDetection.getBlob(n);
        if (b!=null)
        {
            // Edges - 얼룩의 외곽선을 그려주는 부분.
            if (drawEdges)
            {
                strokeWeight(3);
                stroke(0,255,0);
                for (int m=0;m<b.getEdgeNb();m++)
                {
                    eA = b.getEdgeVertexA(m);
                    eB = b.getEdgeVertexB(m);
                    if (eA !=null && eB !=null)
                        line(
                            eA.x*width, eA.y*height,
                            eB.x*width, eB.y*height
                            );
                }
            }

            // Blobs - 얼룩에 사각형을 그려주는 부분.
            if (drawBlobs)
            {
                strokeWeight(0);
                stroke(255,0,0);
//                rect(
//                    b.xMin*width,b.yMin*height,
//                    b.w*width,b.h*height
//                    );
                                rectMode(CENTER);
                rect(
                    b.x*width,b.y*height,
                    b.w*width,b.h*height
                    );

                                // 얼룩의 중심좌표를 b.x 와 b.y로 얻어낼 수 있으므로 특정 영역에 얼룩이
                                // 들어왔는지 판별가능. 단 b.x 와 b.y는 0-1 사이의 값으로 width 와 height를
                                // 곱해 준 후 사용해야함 (아래처럼)
                                // 위에서 정한 노란색 사각 박스 영역안에 얼룩이 들어온 경우 HELLO SADI 출력
                                if((b.x*width>400) && (b.x*width<500)
                                                                && (b.y*height>350) && (b.y*height<450))
                                {
                                   println("******* HELLO SADI *********");
                                }


            }

        }

      }
}


Posted by 알 수 없는 사용자