Research Topics/iPhone SDK2009. 2. 21. 14:15

안녕하세요 박동윤입니다.
지난 Hello sadi! 프로젝트에 가속도 센서의 데이터를 받아 이미지를 움직이는 부분을 추가해보도록 하겠습니다.

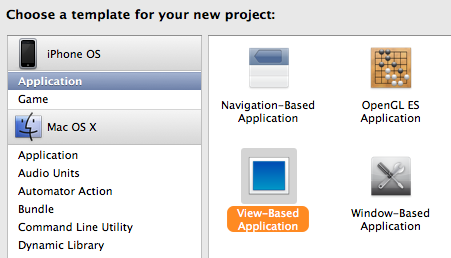
단, 지난 프로젝트에서 Window-Based Application 으로 시작한 것과는 달리 View-Based Application 으로 제작하도록 하겠습니다. (ViewController를 사용)

특별히 다른 것은 없고 Window-Based Application 으로 생성한 프로젝트에서는 AppDelegate 만 존재하여, 우리가 UIView 를 상속한 MyView 라는 클래스를 직접 파일 생성하여 추가해주었습니다만, View-Based Application 에서는 AppDelegate 과 함께 ViewController 라는 것이 생성됩니다. 이 ViewController 는 이미 View 를 담고 있기에 이를 바로 사용하면 됩니다.

View-Based Application 으로 프로젝트 생성


저는 HelloSADIAccel 이라는 이름으로 프로젝트를 생성하였습니다


다음과 같이 AppDelegate 와 ViewController 가 기본적으로 생성됩니다


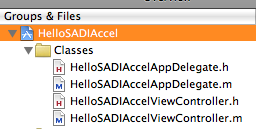
HelloSADIAccelAppDelegate.h 를 보면 다음과 같이 HelloSADIAccelViewController 를 담고 있습니다.
#import <UIKit/UIKit.h>

@class HelloSADIAccelViewController;

@interface HelloSADIAccelAppDelegate : NSObject <UIApplicationDelegate> {
    UIWindow *window;
    HelloSADIAccelViewController *viewController;
}

@property (nonatomic, retain) IBOutlet UIWindow *window;
@property (nonatomic, retain) IBOutlet HelloSADIAccelViewController *viewController;

@end

HelloSADIAccelAppDelegate.m 을 보면 HelloSADIAccelViewController 의 view 를 addSubview 로 window에 추가하는 것을 볼 수 있습니다. 즉, 우리는 이미 존재하는 HelloSADIAccelViewController 의 view 를 사용하면 됩니다.
#import "HelloSADIAccelAppDelegate.h"
#import "HelloSADIAccelViewController.h"

@implementation HelloSADIAccelAppDelegate

@synthesize window;
@synthesize viewController;


- (void)applicationDidFinishLaunching:(UIApplication *)application {   
   
    // Override point for customization after app launch   
    [window addSubview:viewController.view];
    [window makeKeyAndVisible];
}


- (void)dealloc {
    [viewController release];
    [window release];
    [super dealloc];
}


@end

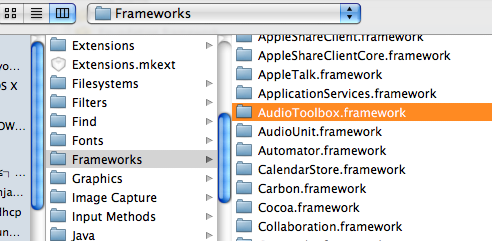
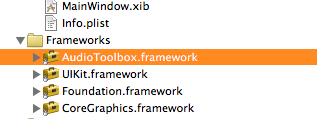
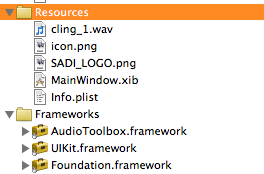
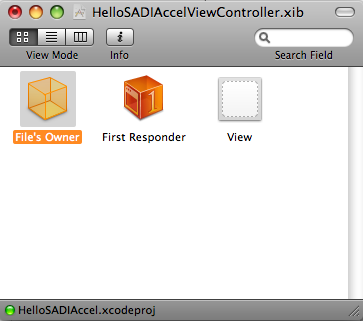
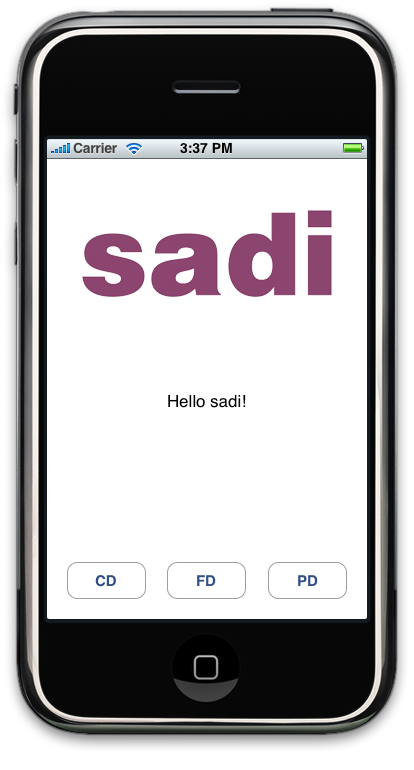
HelloSADIAccelViewController.xib 을 더블클릭하여 인터페이스빌더를 실행하고, 지난번 프로젝트와 동일하게 UI 제작을 합니다. 지난번 처럼, 일단 SADI_LOGO.png 를 프로젝트의 Resource 폴더에 Add 해야겠지요. (지난 세미나자료 참조)


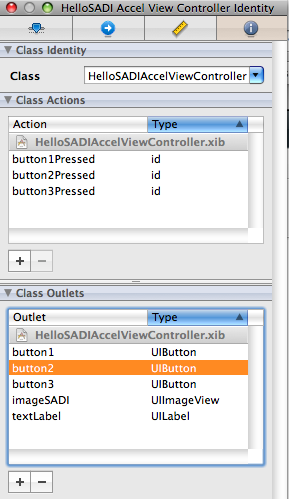
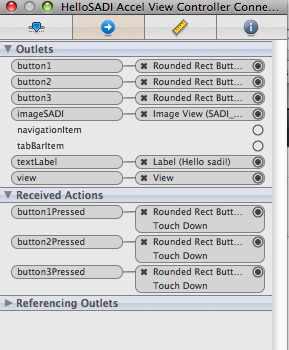
역시 주의할점은 다음과 같이 File's Owner 를 선택한 상태에서 (HelloSADIAccelViewController가 선택된 상태에서)위의 Action/Outlet 연결작업을 해야합니다. 종종 다른 요소의 정보창이 표시된 상태에서 하는 경우가 있습니다.
이때 File's Owner 는 HelloSADIAccelViewController 자신이라고 보면 됩니다.(인스턴스)


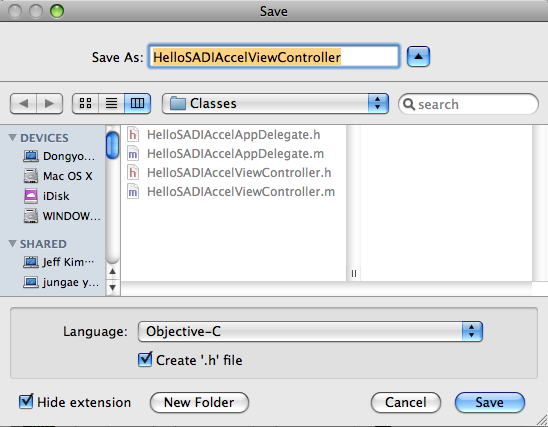
제작이 끝났으면 일단 File - Save 하여 수정된 인터페이스 정보를 xib 파일에 저장하고,
다시, File 메뉴의 Write Class Files 를 눌러 변경사항을 기록합니다. 이때 Merge 를 선택하여 기존 클래스에
정보를 추가합니다.


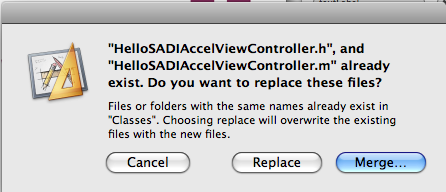
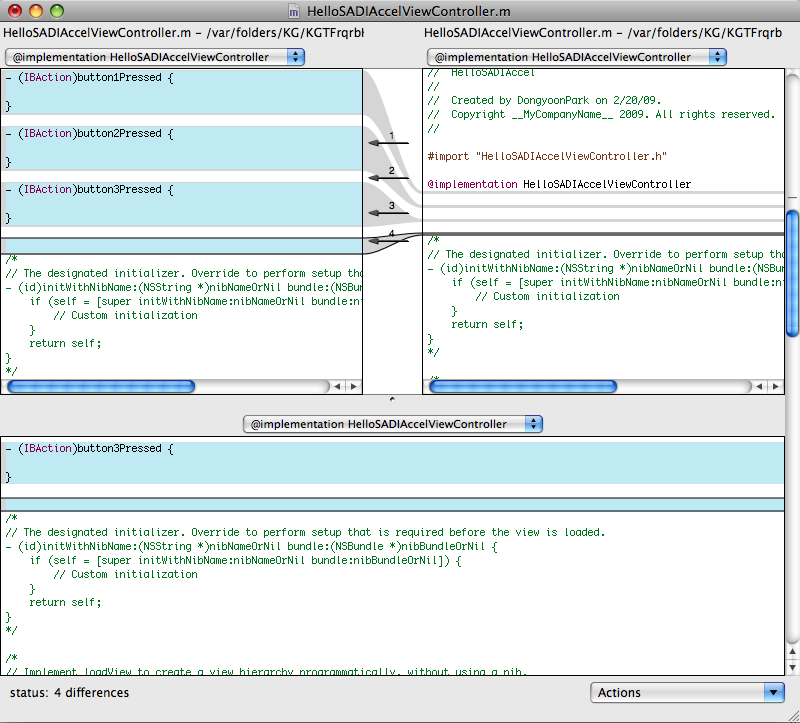
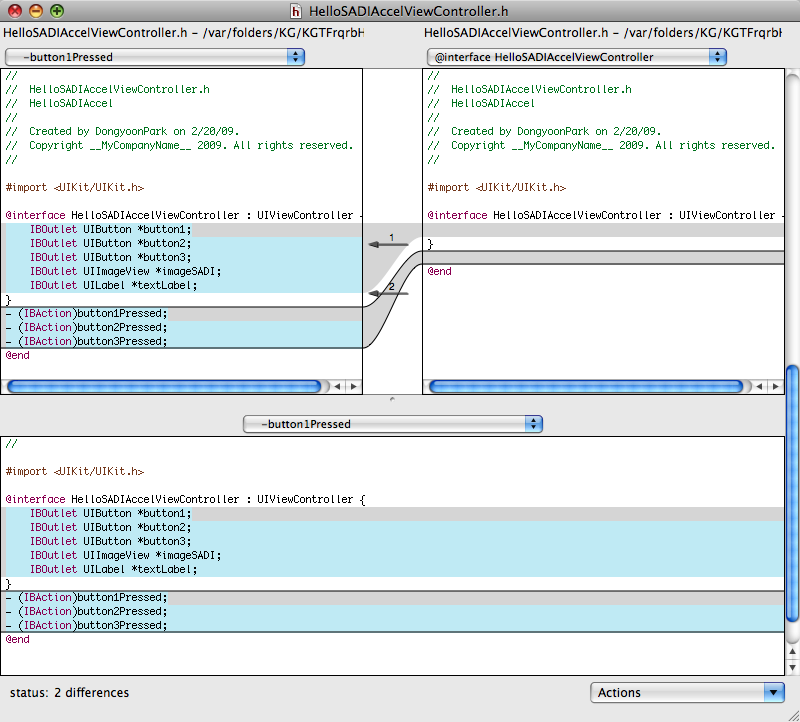
Merge 를 누르면 머지 프로그램이 실행되고 두 코드를 비교하는데,
키보드의 좌우키와 상하키를 이용하여 다음과 같이 변경/추가된 내용들을 좌측 (추가된 내용) 으로 선택하고 save 해줍니다.


HelloSADIAccelViewController.m 파일에 다음과 같이 버튼이 눌렸을때 텍스트가 바뀌도록 수정합니다. (지난번과 동일)

#import "HelloSADIAccelViewController.h"

@implementation HelloSADIAccelViewController
- (IBAction)button1Pressed {
    textLabel.text = @"Communication Design";
}

- (IBAction)button2Pressed {
    textLabel.text = @"Fashion Design";
}

- (IBAction)button3Pressed {
    textLabel.text = @"Product Design";
}


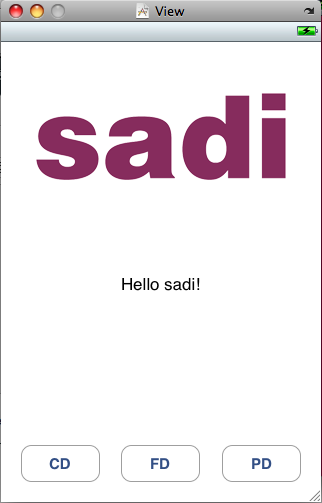
이제 View-Based Application 템플릿으로 지난번과 같은 내용이 완성이 되었습니다.
여기서 가속도 센서를 사용하여 로고를 움직이는 부분을 추가하도록 하겠습니다.

다음과 같이 HelloSADIAccelAppDelegate.h 에 UIAccelerometerDelegate 를 추가해줍니다.
#import <UIKit/UIKit.h>

@class HelloSADIAccelViewController;

@interface HelloSADIAccelAppDelegate : NSObject <UIApplicationDelegate, UIAccelerometerDelegate> {
    UIWindow *window;
    HelloSADIAccelViewController *viewController;
}

@property (nonatomic, retain) IBOutlet UIWindow *window;
@property (nonatomic, retain) IBOutlet HelloSADIAccelViewController *viewController;

@end

HelloSADIAccelAppDelegate.m 에는 다음과 같이 추가하여 가속도 센서를 초기화 하고 didAccelerate 를 구현합니다.
setUpdateInterval 은 말그대로 초당 업데이트 회수(Hertz)를 지정해주는 부분입니다.
#import "HelloSADIAccelAppDelegate.h"
#import "HelloSADIAccelViewController.h"

@implementation HelloSADIAccelAppDelegate

@synthesize window;
@synthesize viewController;


- (void)applicationDidFinishLaunching:(UIApplication *)application {   
    // Configure and start the accelerometer
    [[UIAccelerometer sharedAccelerometer] setUpdateInterval:(1.0 / 40)];
    [[UIAccelerometer sharedAccelerometer] setDelegate:self];
   
    // Override point for customization after app launch   
    [window addSubview:viewController.view];
    [window makeKeyAndVisible];
}

- (void)accelerometer:(UIAccelerometer *)accelerometer didAccelerate:(UIAcceleration *)acceleration {
    [viewController handleAccelerometerX:acceleration.x Y:acceleration.y Z:acceleration.z];
}

- (void)dealloc {
    [viewController release];
    [window release];
    [super dealloc];
}
@end

위에서 handleAccelerometerX:Y:Z: 는 우리가 ViewController 에 구현하여 이미지를 움직일 메소드 입니다.

그럼 다음과 같이 HelloSADIAccelViewController.h 에 메소드를 정의를 하고
#import <UIKit/UIKit.h>

@interface HelloSADIAccelViewController : UIViewController {
    IBOutlet UIButton *button1;
    IBOutlet UIButton *button2;
    IBOutlet UIButton *button3;
    IBOutlet UIImageView *imageSADI;
    IBOutlet UILabel *textLabel;
}
- (IBAction)button1Pressed;
- (IBAction)button2Pressed;
- (IBAction)button3Pressed;
- (void)handleAccelerometerX:(float)x Y:(float)y Z:(float)z;

@end

HelloSADIAccelViewController.m 에 다음과 같이 구현을 합니다.
x, y 축 기울기 에 따라 로고 이미지가 좌우 상하로 움직이게 됩니다.

가속도 센서는 시뮬레이터에서는 테스트 불가능하며, 기기에서만 테스트 가능합니다.
#import "HelloSADIAccelViewController.h"

@implementation HelloSADIAccelViewController
- (IBAction)button1Pressed {
    textLabel.text = @"Communication Design";
}

- (IBAction)button2Pressed {
    textLabel.text = @"Fashion Design";
}

- (IBAction)button3Pressed {
    textLabel.text = @"Product Design";
}

- (void)handleAccelerometerX:(float)x Y:(float)y Z:(float)z {
    if(y<-0.5)   
        imageSADI.center = CGPointMake(imageSADI.center.x, imageSADI.center.y+3);
    if(y>0.5)
        imageSADI.center = CGPointMake(imageSADI.center.x, imageSADI.center.y-3);
    if(x<-0.5)   
        imageSADI.center = CGPointMake(imageSADI.center.x-3, imageSADI.center.y);
    if(x>0.5)
        imageSADI.center = CGPointMake(imageSADI.center.x+3, imageSADI.center.y);
   
}


Posted by 알 수 없는 사용자

Papervision3D 의 기본 뼈대가 되는 코드는 다음과 같습니다.

기본적으로 Sprite 클래스를 상속받고, Viewport3D, Scene3D, Camera3D, BasicRenderEngine 들을 생성/초기화 한 후,
Event.ENTER_FRAME 의 이벤트헨들러에서 계속적으로 renderScene 을 호출하여 3D 화면을 렌더링 합니다.
아래는 검은 배경에 와이어프레임형태의 구(Sphere)를 하나 그리는 내용입니다.

package
{
    import flash.display.Sprite;
    import flash.events.Event;
 
    import org.papervision3d.cameras.Camera3D;
    import org.papervision3d.objects.primitives.Sphere;
    import org.papervision3d.render.BasicRenderEngine;
    import org.papervision3d.scenes.Scene3D;
    import org.papervision3d.view.Viewport3D;
 
    [SWF(width="640", height="480", backgroundColor="#000000", frameRate="60")]
    public class HelloPV3D extends Sprite
    {
        private var viewport:Viewport3D;
        private var scene:Scene3D;
        private var camera:Camera3D;
        private var renderer:BasicRenderEngine;
 
        public function HelloPV3D()
        {
            viewport = new Viewport3D();
            addChild(viewport);
 
            scene = new Scene3D();
            camera = new Camera3D();
            renderer = new BasicRenderEngine();
 
            var sphere:Sphere = new Sphere();
            scene.addChild(sphere);
 
            addEventListener(Event.ENTER_FRAME, enterFrameHandler);
        }
 
        private function enterFrameHandler(event:Event):void
        {
            renderer.renderScene(scene, camera, viewport);
        }
 
    }
}

Viewport3D, Scene3D, Camera3D, BasicRenderEngine 이들이 핵심이라고 할 수 있는데, 이들의 정체를 Reference 에서 살펴보면 다음과 같습니다.

Viewport3D Inheritance flash.display.Sprite
Scene3D Inheritance SceneObject3D Inheritance DisplayObjectContainer3D Inheritance flash.events.EventDispatcher
Camera3D Inheritance CameraObject3D Inheritance DisplayObject3D Inheritance DisplayObjectContainer3D Inheritance flash.events.EventDispatcher
BasicRenderEngine Inheritance AbstractRenderEngine Inheritance flash.events.EventDispatcher

BasicRenderEngine links Viewport3Ds, Scene3D, and Camera3Ds together by gathering in all of their data, rendering the data, then calling the necessary functions to update from the rendered data

한편, 위와 같은 일련의 기본적인 초기화 코드를 구현해 놓은 클래스가 있는데, 바로 BasicView 입니다.
BasicView 를 사용하면 Viewport3D, Scene3D, Camera3D, BasicRenderEngine 초기화 과정을 거치지 않아도 됩니다.

package
{
    import org.papervision3d.objects.primitives.Sphere;
    import org.papervision3d.view.BasicView;
 
    [SWF(width="640", height="480", backgroundColor="#000000", frameRate="60")]
    public class BasicViewTest extends BasicView
    {
        public function BasicViewTest()
        {
            var sphere:Sphere = new Sphere();
            scene.addChild(sphere);
            startRendering();
        }
 
    }
}

이때 render.renderScene(scene, camera, viewport) 부분이 startRendering() 으로 바뀐 것을 볼 수 있습니다.
만약 매 프레임 렌더시에 무언가를 하려면 다음과 같이 BasicView 의 render 함수를 오버라이드해서 우리가 구현할 수 있습니다.

package
{
    import flash.events.Event;

    import org.papervision3d.objects.primitives.Sphere;
    import org.papervision3d.view.BasicView;
 
    [SWF(width="640", height="480", backgroundColor="#000000", frameRate="60")]
    public class BasicViewTest extends BasicView
    {
        public function BasicViewTest()
        {
            var sphere:Sphere = new Sphere();
            scene.addChild(sphere);
            startRendering();
        }

        override protected function onRenderTick(event:Event=null):void
        {
            // 여기서 추가적인 무엇인가를 수행
            renderer.renderScene(scene, camera, viewport);
        }

    }
}

onRenderTick 은 BasicView 클래스에 구현되어 있습니다만, 우리가 여기서 override 하여 우리만의 추가적인
기능을 부여할 수 있습니다.


이번엔 면(Plane)을 하나 만들어 빙글빙글 돌려 보겠습니다.


package
{
    import flash.display.Sprite;
    import flash.events.Event;
 
    import org.papervision3d.cameras.Camera3D;
    import org.papervision3d.render.BasicRenderEngine;
    import org.papervision3d.scenes.Scene3D;
    import org.papervision3d.view.Viewport3D;
    
    import org.papervision3d.materials.ColorMaterial; // 면에 입힐 재질 라이브러리
    import org.papervision3d.objects.primitives.Plane; // 면을 위한 라이브러리 

    [SWF(width="640", height="480", backgroundColor="#ffffff", frameRate="60")]
    public class HelloPV3D extends Sprite
    {
        private var viewport:Viewport3D;
        private var scene:Scene3D;
        private var camera:Camera3D;
        private var renderer:BasicRenderEngine;
        public var plane:Plane; // Plane(면) 클래스의 인스턴스변수 선언

        public function HelloPV3D()
        {
            viewport = new Viewport3D();
            addChild(viewport);
 
            scene = new Scene3D();
            camera = new Camera3D();
            renderer = new BasicRenderEngine();
 
            var material:ColorMaterial = new ColorMaterial(0x33ddff, 1); // 파란색 재질 생성
            material.doubleSided = true;

            plane = new Plane(material, 300, 300, 1, 1); // 위에서 만든 재질로 면을 생성
            scene.addChild(plane); // 씬에 면을 추가
 
            addEventListener(Event.ENTER_FRAME, enterFrameHandler);
        }
 
        private function enterFrameHandler(event:Event):void
        {
            plane.yaw(2); // 면을 2도씩 Y축을 기준으로돌린다
            renderer.renderScene(scene, camera, viewport);
        }
 
    }
}

위에서 x, y, z 축의 회전은 각각 pitch, yaw, roll 을 사용합니다. 즉,
plane.pitch(2);
plane.yaw(2);
plane.roll(2);
이렇게 다 써주면 x,y,z 축 모두를 기준으로 빙글빙글 돌겠죠.
Posted by 알 수 없는 사용자

타임라인 기반 플래시에서 easing 이라고 불렸던, 기타 애프터이펙트나 3D 프로그램들의 애니메이션 그래프에서 볼 수 있는
부드러운 가/감속 기능을 구현해 놓은 클래스 입니다. 어떤 인터렉션 작업을 하던 필수적으로 사용되므로 꼭 알아놓아야 할
클래스 중에 하나입니다.

기본적으로는 Adobe 에서 구현해놓은 Tween 클래스가 이미 flash 에 내장이 되어있습니다만, 퍼포먼스를 이보다 개선한 클래스들이 몇 있습니다. 그중 널리 사용되는 유명한 클래스가 caurina tweener 이고, 다른하나는 tweenmax 입니다.

Caurina Tweener
http://code.google.com/p/tweener/

TweenMax
http://blog.greensock.com/tweenmaxas3/


Posted by 알 수 없는 사용자


CS4의 Preferences 의 ActionScript 3.0 Settings 메뉴는 CS3와 달리
위 화면과 같이 세가지로 구분이 되어있습니다. 아래 설명은 Adobe Help 에서 찾은 설명입니다. 참고하세요.
즉 .as 로 존재하는 library 들은 위와같이 첫번째 source path 에 경로를 지정해주면 되고,
.swc 로 존재하는 library 들은 두번째의 library path 에 경로를 지정해주면 됩니다.

이렇게 flash의 Preferences 에서 설정한 라이브러리는 모든 flash파일에 공통적으로 적용이 되고 사용할 수 있으므로, Papervision3D 와 같은 라이브러리는 여기서 설정하여 사용할 수 있게 하면 좋겠죠. (Application level)

각 flash파일에서만 필요한 라이브러리는 해당 파일의 publish setting 화면에서 ActionScript 3.0 Setting 에서 path를 지정해 줄 수 있습니다. (Document level)

Set the location of ActionScript files

To use an ActionScript class that you’ve defined, Flash must locate the external ActionScript files that contain the class definition. The list of folders in which Flash searches for class definitions is called the classpath for ActionScript 2.0 and the source path for ActionScript 3.0. Classpaths and source paths exist at the application (global) or document level. For more information about classpaths, see Classes in Learning ActionScript 2.0 in Adobe Flash or “Packages” in Programming ActionScript 3.0.


You can set the following ActionScript locations in Flash:

  • ActionScript 2.0

    • Application level (available to all AS2 FLA files):

      • Classpath (set in ActionScript preferences)

    • Document level (available only to the FLA file that specifies this path):

      • Classpath (set in Publish Settings)

  • ActionScript 3.0

    • Application level (available to all AS3 FLA files):

      • Source path (set in ActionScript preferences)

      • Library path (set in ActionScript preferences)

      • External library path (set in ActionScript preferences)

    • Document level (available only to the FLA file that specifies these paths):

      • Source path (set in Publish Settings)

      • Library path (set in Publish Settings)

      • External library path (set in Publish Settings)

      • Document class (set in Document Property inspector)

In ActionScript 3.0, there are two additional paths that you can set to specify the locations of ActionScript resources.

The Library path specifies the location of pre-compiled ActionScript code which resides in SWC files you have created. The FLA file that specifies this path loads every SWC file at the top level of this path and any other code resources that are specified within the SWC files themselves. If you use the Library path, be sure none of the compiled code in the SWC files is duplicated in uncompiled AS files in the Source path. The redundant code will slow down compilation of your SWF file.

The External Library path specifies the location of SWC files that contain code used for compiler error definitions. This path can be used to load external code resources in SWC format so that the classes within them can be used at runtime. When you compile a SWF, the SWC files in the External Library path are not added to the SWF file, but the compiler verifies that they are in the locations you specified. The External Library path is most often used for runtime shared libraries. For more information about runtime shared libraries, see Working with runtime shared assets. For more information about loading external code at runtime, see Programming ActionScript 3.0.

For each type of resource path, you can specify more than one path for Flash to look in. Resources found in any of the paths specified will be used.

Posted by 알 수 없는 사용자

1. Papervision3D 설치

Papervision3D Google Code - Download 에서 Papervision3D 라이브러리 zip 파일을 받을 수 있습니다.
http://code.google.com/p/papervision3d/

받으신 압축파일은 데스크탑이나 기타 위치에 풀어놓으면 됩니다.
(아래의 경우는 Papervision3D_2.0.869 라는 폴더)

Flash 의 Preference - ActionScript - ActionScript 3.0 Settings 에서 다음과 같이 해당 폴더를 지정해 줍니다.
이렇게 하면 Flash 에서 Papervision3D 에 정의/구현 되어 있는 DisplayObject3D, ViewPort3D 등 3D 관련
Class 들을 사용 할 수 있게 됩니다. 

CS3 에서 설정방법


CS4 에서 설정방법


2. 샘플 코드 실행
많은 Papervision3D의 샘플코드들을 받아보면 Document Class 방식으로 되어있어 .as 파일만 존재합니다.
따라서, 이를 실행해보기 위해서는 신규 AS3.0 의 fla 파일을 만들어 해당 class 를 지정해 주어야 합니다.
즉 .as 파일을 실행하기 위한 껍데기(?)가 필요한 것입니다.

다음 예제파일을 실행해 보도록 하겠습니다.
http://pv3d.org/2009/02/03/internal-carousel/

다음과 같이 일단 .as 파일을 flash 에서 오픈합니다.


새 Flash 파일을 만듭니다. (AS3.0으로)


새파일을 .as 파일이 있는 폴더에 같이 저장합니다. (fla 로저장되겠죠. 이름은 상관 없습니다)
저장 후, 우측의 Properties 탭에서 Class 라는 부분의 필드에 해당 .as 의 파일명 (=클래스명)을 입력해 줍니다.
이때 .as 는 입력하지 않습니다.
CS3 에서는 화면 아래쪽에 Document Class 라는 필드가 있습니다.


입력후 우측의 연필모양의 버튼을 눌렀을때 .as 파일이 잘 열리면 제대로 연결 지정이 된 겁니다.
즉 새로만든 Test.fla 파일은 지정한 InternalCarousel 이라는 클래스를 사용하여 동작한다고 명시를 해 준 것입니다.


실행을해봅니다. 실행이 되지 않으면 output 창의 로그를 확인하세요. 주로 Papervision3D 라이브러리 패스가
올바르게 설정되지 않은 경우가 많습니다.


Posted by 알 수 없는 사용자
CS3 /AS3.0 이후의 큰 특징중 하나인 Document Class 라는 개념입니다.
코드부분이 완전히 분리되어서 별도의 독립적인 파일이 존재합니다. .fla / .as

아래 영상을 참고하세요.
http://www.adobe.com/designcenter/video_workshop/?id=vid0129

Papervision3D 를 보시려면 Document Class 를 알고 시작하면 도움이 많이 됩니다.
아래는 Adobe Help 에 있는 설명입니다. 참고하세요.

Declare an ActionScript 3.0 document class

When you use ActionScript 3.0, a SWF file may have a top-level class associated with it. This class is called the document class. When the SWF is loaded by Flash Player, an instance of this class is created to be the SWF file's top-level object. This object of a SWF file can be an instance of any custom class you choose.

For example, a SWF file that implements a calendar component can associate its top level with a Calendar class, with methods and properties appropriate to a calendar component. When the SWF is loaded, Flash Player creates an instance of this Calendar class.

  1. Deselect all objects on the Stage and in the Timeline by clicking a blank area of the Stage. This displays the Document properties in the Property inspector.
  2. Enter the filename of the ActionScript file for the class in the Document Class text box in the Property inspector. Do not include the .as filename extension.
Note: You can also enter the Document Class information in the Publish Settings dialog box.

Posted by 알 수 없는 사용자
Research Topics/iPhone SDK2009. 2. 16. 01:44
지난번 예제에서 터치시에 간단한 짧은 사운드를 플레이하는 예제입니다.

일단, 가장먼저 사운드를 사용하기 위하여 AudioToolbox 라는 프레임웍을 프로젝트에 추가해주어야 합니다.


그리고 프로젝트에 짤막한 사운드파일 (wav나 mp3 등)을 추가해 줍니다. 저는 cling_1.wav 라는 파일을 추가했습니다.


기본적으로, 사운드를 사용하는 예제들은 같은 방법을 사용하기에, 애플의 iPhone Dev Center 에서 제공하는
sample code 중 사운드를 사용하는 것을 하나 골라잡아 다운로드를 합니다.

저는 GLPaint 라는 그림그리기 app 예제를 받았습니다.
받은 dmg 파일을 를 열어 프로젝트를 열면 다음과 같이 SoundEffect.h 와 SoundEffect.m 파일이 있습니다. 
두 파일을 그대로 마우스로 드래그하여 우리가 만들었던 Hello sadi 프로젝트에 집어넣습니다.
이때 뜨는 창에서는 Copy ... 를 체크하여 아예 파일을 우리의 프로젝트 폴더로 실제로 복사해 오도록 해줍니다.


SoundEffect.h 에는 다음과 같은 내용이 보입니다.
SoundEffect 라는 class 를 정의해 놓은 부분입니다.

initWithContentsOfFile 이라는 함수와 play 라는 함수가 보이네요. 기능은 이름만 봐도 알 수 있겠죠?
사운드 파일과 함께 초기화 하고, 사운드를 플레이를 해주는 함수 인것을 예상할 수 있습니다.
#import <UIKit/UIKit.h>
#import <AudioToolbox/AudioServices.h>

@interface SoundEffect : NSObject {
    SystemSoundID _soundID;
}

+ (id)soundEffectWithContentsOfFile:(NSString *)aPath;
- (id)initWithContentsOfFile:(NSString *)path;
- (void)play;

@end

SoundEffect.m 에는 위의 내용들이 구현이 되어있습니다만, 굳이 자세히 알 필요는 없습니다.
우리는 이를 활용해서 play 만 하면 되니까요.

그럼, 우리가 만들었던 MainView의 헤더인 MainView.h 로 가서 다음과같이 사운드 부분을 추가해 줍니다.
위에서 가져온 SoundEffect 라는 클래스의 인스턴스변수를 추가해 주어 MainView 에서 사용할 예정입니다.
#import <UIKit/UIKit.h>
#import <Foundation/Foundation.h>
#import "SoundEffect.h"


@interface MainView : UIView {
    IBOutlet UIProgressView *alphaProgress;
    IBOutlet UISlider *alphaSlider;
    IBOutlet UILabel *alphaText;
    IBOutlet UIImageView *imageView;
    IBOutlet UIButton *button1;
    IBOutlet UIButton *button2;
    IBOutlet UIButton *button3;
    IBOutlet UIBarButtonItem *playButton;
   
    SoundEffect *soundEffect;
}
- (IBAction)changeAlpha;
- (IBAction)changeAlphaButton1;
- (IBAction)changeAlphaButton2;
- (IBAction)changeAlphaButton3;
@end

구현부분인 MainView.m 에서는 다음과 같이 추가를 합니다.
awakeFromNib 은 앞서 예제에서 사용했던 Interface Builder 의 파일인 .xib
(과거에는 .nib이었기에 주로 nib이라고아직도 부릅니다) 에서 불리는 함수 입니다.
다음과같은 코드로 사운드 파일을 로드할 수 있습니다. (이경우는 cling_1.wav 파일 입니다)
-(void)awakeFromNib {
    NSBundle *mainBundle = [NSBundle mainBundle];
    soundEffect =
            [[SoundEffect alloc] initWithContentsOfFile:[mainBundle pathForResource:@"cling_1" ofType:@"wav"]];
}


이제 사운드 로드과정이 완료되었으므로, 원하는 부분에서 play 만 해주면 됩니다.
play는 아주 간단히 다음코드 한줄로 끝입니다.
[soundEffect play];

저는 터치가 되었을때 소리가 나도록 touchesBegan 에 넣었습니다.
- (void)touchesBegan:(NSSet *)touches withEvent:(UIEvent *)event {
    [soundEffect play];
}

이제, 손가락으로 화면을 터치할때마다 cling_1.wav 사운드가 들리게 됩니다.

Posted by 알 수 없는 사용자
Research Topics/Arduino2009. 2. 16. 01:31

Arduino 보드에서 Arduino 프로그램으로 USB Serial 방식으로 전송하기때문에, Processing 에서도 Serial API를 활용하여
Arduino 보드에서 보내는 데이터를 읽어낼 수 있다.

Arduino 코드에서는 Serial.print를 이용하여 Serial 데이터를 송신
int flexiSensor = 5;
int button1 = 2;
int button2 = 3;


int flexiValue = 0;
int button1Value = 0;
int button2Value = 0;

void setup()
{
  Serial.begin(9600);
 
  pinMode(button1, INPUT); 
  pinMode(button2, INPUT);
}

void loop ()
{
  flexiValue = analogRead(flexiSensor);
  button1Value = digitalRead(button1);
  button2Value = digitalRead(button2);
 
  Serial.print(flexiValue, DEC);
  Serial.print(",");
  Serial.print(button1Value, DEC);
  Serial.print(","); 
  Serial.println(button2Value, DEC);
}

Processing 에서는 serial 라이브러리를 추가해주고,  Serial.list() 를 이용해 목록확인, 읽어들일 포트를 설정한 후

serialEvent 함수를 구현하여 그안에서 데이터가 왔을경우에 대한 처리를 한다
import processing.serial.*;

Serial inputPort;
int linefeed = 10;
int ballPosition = 10;

void setup()
{
  size(640,480);
  println(Serial.list()); // 가용한 serial port 의 자원의 목록을 보여준다
 
  inputPort = new Serial(this, Serial.list()[0], 9600); // 이경우는 목록의 [0] 번이 Arduino 인경우임
  inputPort.bufferUntil(linefeed);
  
}


void draw()
{
   background(0);
   fill(255,230,0);
   ellipse(ballPosition, 50, 50, 50);
   print("ballPosition=" + ballPosition);

}

void serialEvent(Serial inputPort) // serial port 로 데이터가 들어올 경우 호출되는 함수
{
  String inputString = inputPort.readStringUntil(linefeed);
 
  if(inputString != null)
  {
    inputString = trim(inputString);
    int sensorValues[] = int(split(inputString, ','));
    ballPosition = sensorValues[0];
   
  }
}

이와 같은 방법으로 Arduino 를 통한 다양한 센서, 버튼 등의 physical 한 interface 의 입력을 받아
Processing 을 통하여 graphical 한 visual 요소를 표현 할 수 있다.


Posted by 알 수 없는 사용자
Research Topics/Arduino2009. 2. 14. 11:13

초음파센서 SRF05 와이어링과 샘플코드 - Arduino 프로그램의 Serial Monitor 에 cm, inch 로 거리 출력

Mode선과 0V Gnd 모두 Gnd로 연결하면 됨.


int pingPin = 9;

void setup()                    // run once, when the sketch starts
{
   Serial.begin(9600);
}

void loop()                     // run over and over again
{
    long duration, inches, cm;

  // The PING))) is triggered by a HIGH pulse of 2 or more microseconds.
  // We give a short LOW pulse beforehand to ensure a clean HIGH pulse.
  pinMode(pingPin, OUTPUT);
  digitalWrite(pingPin, LOW);
  delayMicroseconds(2);
  digitalWrite(pingPin, HIGH);
  delayMicroseconds(5);
  digitalWrite(pingPin, LOW);

  // The same pin is used to read the signal from the PING))): a HIGH
  // pulse whose duration is the time (in microseconds) from the sending
  // of the ping to the reception of its echo off of an object.
  pinMode(pingPin, INPUT);
  duration = pulseIn(pingPin, HIGH);

  // convert the time into a distance
  inches = microsecondsToInches(duration);
  cm = microsecondsToCentimeters(duration);

  Serial.print(inches);
  Serial.print("in, ");
  Serial.print(cm);
  Serial.print("cm");
  Serial.println();

  delay(100);
}

long microsecondsToInches(long microseconds)
{
  // According to Parallax's datasheet for the PING))), there are
  // 73.746 microseconds per inch (i.e. sound travels at 1130 feet per
  // second).  This gives the distance travelled by the ping, outbound
  // and return, so we divide by 2 to get the distance of the obstacle.
  // See: http://www.parallax.com/dl/docs/prod/acc/28015-PING-v1.3.pdf
  return microseconds / 74 / 2;
}

long microsecondsToCentimeters(long microseconds)
{
  // The speed of sound is 340 m/s or 29 microseconds per centimeter.
  // The ping travels out and back, so to find the distance of the
  // object we take half of the distance travelled.
  return microseconds / 29 / 2;
}


Posted by 알 수 없는 사용자