Research Topics/iPhone SDK2009. 2. 16. 01:44
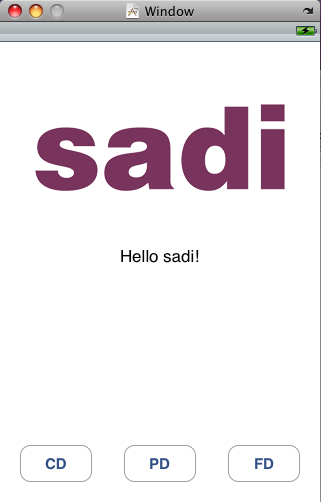
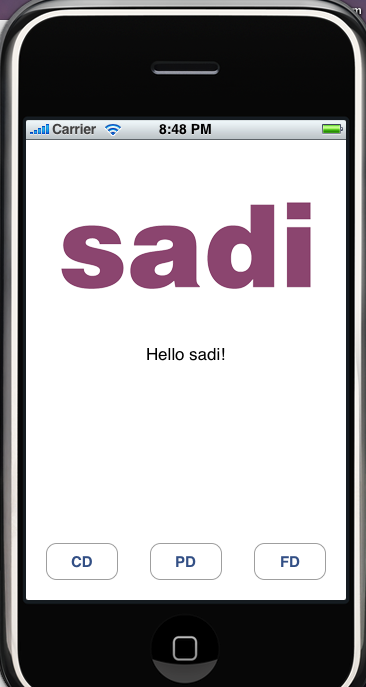
지난번 예제에서 터치시에 간단한 짧은 사운드를 플레이하는 예제입니다.

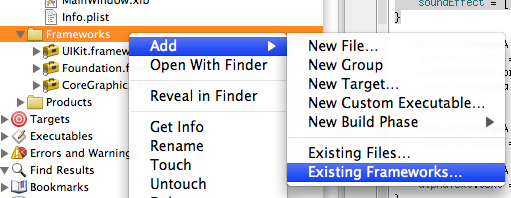
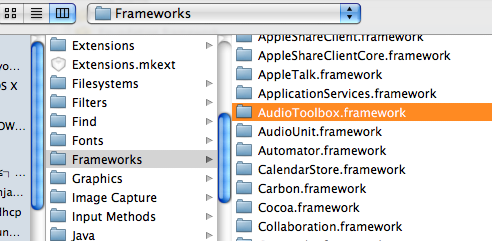
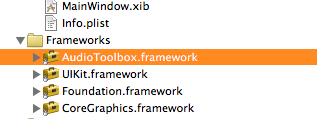
일단, 가장먼저 사운드를 사용하기 위하여 AudioToolbox 라는 프레임웍을 프로젝트에 추가해주어야 합니다.


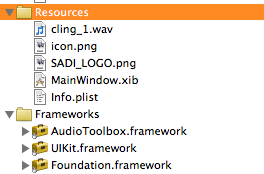
그리고 프로젝트에 짤막한 사운드파일 (wav나 mp3 등)을 추가해 줍니다. 저는 cling_1.wav 라는 파일을 추가했습니다.


기본적으로, 사운드를 사용하는 예제들은 같은 방법을 사용하기에, 애플의 iPhone Dev Center 에서 제공하는
sample code 중 사운드를 사용하는 것을 하나 골라잡아 다운로드를 합니다.

저는 GLPaint 라는 그림그리기 app 예제를 받았습니다.
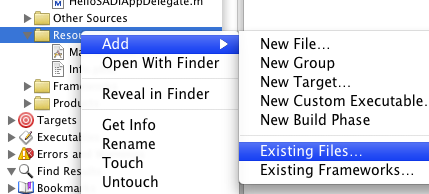
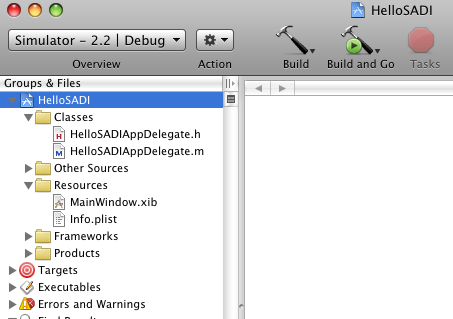
받은 dmg 파일을 를 열어 프로젝트를 열면 다음과 같이 SoundEffect.h 와 SoundEffect.m 파일이 있습니다. 
두 파일을 그대로 마우스로 드래그하여 우리가 만들었던 Hello sadi 프로젝트에 집어넣습니다.
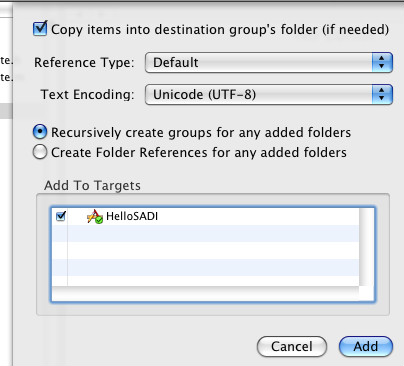
이때 뜨는 창에서는 Copy ... 를 체크하여 아예 파일을 우리의 프로젝트 폴더로 실제로 복사해 오도록 해줍니다.


SoundEffect.h 에는 다음과 같은 내용이 보입니다.
SoundEffect 라는 class 를 정의해 놓은 부분입니다.

initWithContentsOfFile 이라는 함수와 play 라는 함수가 보이네요. 기능은 이름만 봐도 알 수 있겠죠?
사운드 파일과 함께 초기화 하고, 사운드를 플레이를 해주는 함수 인것을 예상할 수 있습니다.
#import <UIKit/UIKit.h>
#import <AudioToolbox/AudioServices.h>

@interface SoundEffect : NSObject {
    SystemSoundID _soundID;
}

+ (id)soundEffectWithContentsOfFile:(NSString *)aPath;
- (id)initWithContentsOfFile:(NSString *)path;
- (void)play;

@end

SoundEffect.m 에는 위의 내용들이 구현이 되어있습니다만, 굳이 자세히 알 필요는 없습니다.
우리는 이를 활용해서 play 만 하면 되니까요.

그럼, 우리가 만들었던 MainView의 헤더인 MainView.h 로 가서 다음과같이 사운드 부분을 추가해 줍니다.
위에서 가져온 SoundEffect 라는 클래스의 인스턴스변수를 추가해 주어 MainView 에서 사용할 예정입니다.
#import <UIKit/UIKit.h>
#import <Foundation/Foundation.h>
#import "SoundEffect.h"


@interface MainView : UIView {
    IBOutlet UIProgressView *alphaProgress;
    IBOutlet UISlider *alphaSlider;
    IBOutlet UILabel *alphaText;
    IBOutlet UIImageView *imageView;
    IBOutlet UIButton *button1;
    IBOutlet UIButton *button2;
    IBOutlet UIButton *button3;
    IBOutlet UIBarButtonItem *playButton;
   
    SoundEffect *soundEffect;
}
- (IBAction)changeAlpha;
- (IBAction)changeAlphaButton1;
- (IBAction)changeAlphaButton2;
- (IBAction)changeAlphaButton3;
@end

구현부분인 MainView.m 에서는 다음과 같이 추가를 합니다.
awakeFromNib 은 앞서 예제에서 사용했던 Interface Builder 의 파일인 .xib
(과거에는 .nib이었기에 주로 nib이라고아직도 부릅니다) 에서 불리는 함수 입니다.
다음과같은 코드로 사운드 파일을 로드할 수 있습니다. (이경우는 cling_1.wav 파일 입니다)
-(void)awakeFromNib {
    NSBundle *mainBundle = [NSBundle mainBundle];
    soundEffect =
            [[SoundEffect alloc] initWithContentsOfFile:[mainBundle pathForResource:@"cling_1" ofType:@"wav"]];
}


이제 사운드 로드과정이 완료되었으므로, 원하는 부분에서 play 만 해주면 됩니다.
play는 아주 간단히 다음코드 한줄로 끝입니다.
[soundEffect play];

저는 터치가 되었을때 소리가 나도록 touchesBegan 에 넣었습니다.
- (void)touchesBegan:(NSSet *)touches withEvent:(UIEvent *)event {
    [soundEffect play];
}

이제, 손가락으로 화면을 터치할때마다 cling_1.wav 사운드가 들리게 됩니다.

Posted by 알 수 없는 사용자
Research Topics/Arduino2009. 2. 16. 01:31

Arduino 보드에서 Arduino 프로그램으로 USB Serial 방식으로 전송하기때문에, Processing 에서도 Serial API를 활용하여
Arduino 보드에서 보내는 데이터를 읽어낼 수 있다.

Arduino 코드에서는 Serial.print를 이용하여 Serial 데이터를 송신
int flexiSensor = 5;
int button1 = 2;
int button2 = 3;


int flexiValue = 0;
int button1Value = 0;
int button2Value = 0;

void setup()
{
  Serial.begin(9600);
 
  pinMode(button1, INPUT); 
  pinMode(button2, INPUT);
}

void loop ()
{
  flexiValue = analogRead(flexiSensor);
  button1Value = digitalRead(button1);
  button2Value = digitalRead(button2);
 
  Serial.print(flexiValue, DEC);
  Serial.print(",");
  Serial.print(button1Value, DEC);
  Serial.print(","); 
  Serial.println(button2Value, DEC);
}

Processing 에서는 serial 라이브러리를 추가해주고,  Serial.list() 를 이용해 목록확인, 읽어들일 포트를 설정한 후

serialEvent 함수를 구현하여 그안에서 데이터가 왔을경우에 대한 처리를 한다
import processing.serial.*;

Serial inputPort;
int linefeed = 10;
int ballPosition = 10;

void setup()
{
  size(640,480);
  println(Serial.list()); // 가용한 serial port 의 자원의 목록을 보여준다
 
  inputPort = new Serial(this, Serial.list()[0], 9600); // 이경우는 목록의 [0] 번이 Arduino 인경우임
  inputPort.bufferUntil(linefeed);
  
}


void draw()
{
   background(0);
   fill(255,230,0);
   ellipse(ballPosition, 50, 50, 50);
   print("ballPosition=" + ballPosition);

}

void serialEvent(Serial inputPort) // serial port 로 데이터가 들어올 경우 호출되는 함수
{
  String inputString = inputPort.readStringUntil(linefeed);
 
  if(inputString != null)
  {
    inputString = trim(inputString);
    int sensorValues[] = int(split(inputString, ','));
    ballPosition = sensorValues[0];
   
  }
}

이와 같은 방법으로 Arduino 를 통한 다양한 센서, 버튼 등의 physical 한 interface 의 입력을 받아
Processing 을 통하여 graphical 한 visual 요소를 표현 할 수 있다.


Posted by 알 수 없는 사용자
Research Topics/Arduino2009. 2. 14. 11:13

초음파센서 SRF05 와이어링과 샘플코드 - Arduino 프로그램의 Serial Monitor 에 cm, inch 로 거리 출력

Mode선과 0V Gnd 모두 Gnd로 연결하면 됨.


int pingPin = 9;

void setup()                    // run once, when the sketch starts
{
   Serial.begin(9600);
}

void loop()                     // run over and over again
{
    long duration, inches, cm;

  // The PING))) is triggered by a HIGH pulse of 2 or more microseconds.
  // We give a short LOW pulse beforehand to ensure a clean HIGH pulse.
  pinMode(pingPin, OUTPUT);
  digitalWrite(pingPin, LOW);
  delayMicroseconds(2);
  digitalWrite(pingPin, HIGH);
  delayMicroseconds(5);
  digitalWrite(pingPin, LOW);

  // The same pin is used to read the signal from the PING))): a HIGH
  // pulse whose duration is the time (in microseconds) from the sending
  // of the ping to the reception of its echo off of an object.
  pinMode(pingPin, INPUT);
  duration = pulseIn(pingPin, HIGH);

  // convert the time into a distance
  inches = microsecondsToInches(duration);
  cm = microsecondsToCentimeters(duration);

  Serial.print(inches);
  Serial.print("in, ");
  Serial.print(cm);
  Serial.print("cm");
  Serial.println();

  delay(100);
}

long microsecondsToInches(long microseconds)
{
  // According to Parallax's datasheet for the PING))), there are
  // 73.746 microseconds per inch (i.e. sound travels at 1130 feet per
  // second).  This gives the distance travelled by the ping, outbound
  // and return, so we divide by 2 to get the distance of the obstacle.
  // See: http://www.parallax.com/dl/docs/prod/acc/28015-PING-v1.3.pdf
  return microseconds / 74 / 2;
}

long microsecondsToCentimeters(long microseconds)
{
  // The speed of sound is 340 m/s or 29 microseconds per centimeter.
  // The ping travels out and back, so to find the distance of the
  // object we take half of the distance travelled.
  return microseconds / 29 / 2;
}


Posted by 알 수 없는 사용자
ActionScript 3.0을 공부하기위한 가장 기본적으로, 항상 참고해야할 사이트 입니다.
ActionScript Technology Center
http://www.adobe.com/devnet/actionscript/

레퍼런스
http://help.adobe.com/en_US/AS3LCR/Flash_10.0/

페이지를 보시면 다음과 같이 레퍼런스와 Programming 가이드 문서가 있습니다.
한글 버전은 주요 Object들의 이름들까지 한글로 번역을 해놓아서 오히려 혼돈의 우려가 있더군요.
(예:Display Object - 표시객체)
따라서, 영문문서를 보는것이 좋습니다. 아래와 같이 문서들이 있습니다.


일단은 Flash 를 기준으로 스터디를 하기 위해 Flash용 문서를 받아 보시면 됩니다.
(ActionScript 에 대한 내용은 기본적으로 같습니다.)

해당 페이지로 들어가셔서 우측 상단을 보시면 PDF 로 다운로드 받을 수 있는 메뉴가 있습니다.
PDF 로 저장해놓고 수시로 볼 수 있는게 좋겠죠.


AS3.0 의 주요 특징
- ActionScript 3.0 goes beyond the scripting capabilities of previous versions of ActionScript. It is designed to facilitate the creation of highly complex applications with large data sets and object-oriented, reusable code bases.
- 새로운 버전의 ActionScript Virtual Machine2 (AVM2) 사용
- ActionScript 3.0 is architecturally and conceptually different from previous versions of ActionScript.
- A single SWF file cannot combine ActionScript 1.0 or 2.0 code with ActionScript 3.0 code.

AS2.0 과의 표면적인 차이점
완전한 프로그래밍 언어의 성격을 갖추면서 변수의 타입을 명확하게 명시를 해주어야 합니다.
기존처럼 타임라인 여기저기서 무비클립등에다가 임의로 이름만 써서 변수를 만들던 방식은 이제 통용불가!

다음과 같이 변수 선언시 var 를 붙이고, 변수이름 뒤에는 : 와 타입명을 명시해주어야 함.
var myNumber:Number = 17;
var myString:String = "Hello SADI";


class (클래스) 와 object (객체) 그리고 instance(인스턴스) 개념
AS3.0 이 Object Oriented Programming 을 지향하면서 이들의 개념도 알아야 제대로 다룰 수 있게 되었습니다.
이들은 Processing 이나 Java 에 등장하는 class 와 같습니다.

Two words that are often used as synonyms for data type are class and object. A class is simply the definition of a data type—it’s like a template for all objects of the data type, like saying “all variables of the Example data type have these characteristics: A, B, and C.” An object, on the other hand, is just an actual instance of a class; a variable whose data type is MovieClip could be described as a MovieClip object. The following are different ways of saying the same thing:

•The data type of the variable myVariable is Number.
•The variable myVariable is a Number instance.
•The variable myVariable is a Number object.
•The variable myVariable is an instance of the Number class.

즉 class 는 붕어빵 틀과 같은 틀을 말하고 object 나 instance 라는 말은 실제로 찍어낸 붕어빵들을 말합니다.


이벤트 핸들링
AS3.0 에서는 다음과같이 이벤트 리스너 메소드(=함수) 를 만들어놓고, addEventListener 라는 함수로 등록을 해줍니다.

function myEventResponse(event:MouseEvent):void
{
// myButton 이 클릭되었을때 실행할 동작 구현...
}

myButton.addEventListener(MouseEvent.CLICK, myEventResponse);


DisplayObject 계층구조 (신명용 강사님의 세미나 자료 내용)
AS3.0 으로 Flash 를 제대로 다루려면, 다음 구조를 정확히 알고있어야 합니다.

MovieClip Inheritance Sprite Inheritance DisplayObjectContainer Inheritance InteractiveObject Inheritance DisplayObject Inheritance EventDispatcher Inheritance Object

Object  최상위 객체 - 모든 클래스는 Object를 상속
EventDispatcher
 이벤트 발생기
 addEventListner(이벤트타입, 리스너함수);
 removeEventListener(이벤트타입, 리스너함수);
 dispatchEvent(이벤트)
DisplayObject
 눈에 보이는 객체 : Graphics, Bitmap, Shape
 x, y, width, height, alpha, rotation, visible,
 mouseX, mouseY, scaleX, scaleY
 (AS1.0에서는 속성들 앞에 _ 가 붙었으나 이젠 붙이지 않음)
InteractiveObject
 사용자에 반응하는 객체
 SimpleButton, TextField
DisplayObjectContainer
 다른 객체를 포함할 수 있는 객체 (Sprite, Stage, Loader)
 담긴객체 : child, 담는객체 : parent, 깊이 : index
 mouseChildren, numChildren, tabChildren
 contains(), addChild(), addChildAt(), removeChild(),
 removeChildAt(), getChildIndex(), getChildAt(),
 setChildIndex()
Sprite
 프레임이 없는 무비클립
 buttonMode, graphics, hitArea, soundTransform ...
 startDrag(), stopDrag()
MovieClip
 프레임을 가진 Sprite


Posted by 알 수 없는 사용자
안녕하세요 박동윤입니다. 
지난 1월24일에 진행했던 세미나를 정리해드립니다. 천천히 다시 보시면 도움 되실겁니다 ^^
설명드렸던 간단한 터치 어플리케이션에 대한 제작 과정 설명입니다.

ADC 가입, SDK 및 문서 받기, iPhone Developer Program 등에 대한 것은 앞선 글을 참고하세요
(메일로 보내드렸던 글입니다)

1. Xcode 실행 및 프로젝트 생성


File - New Project 에서 Window-Based Application 을 선택합니다.
저희는 Windows 만 생성된 맨바탕에 View를 만들고 요소들을 추가할 예정입니다.

프로젝트 이름은 HelloSADI 와 같이 원하는 이름을 적어주시면 됩니다.
위치도 데스크탑이나 원하는 폴더에 저장하시면 됩니다.


다음 두개의 png 파일을 데스크탑에 저장하시고


프로젝트의 Resources 폴더에서 오른쪽클릭, Add - Existing Files 를 선택하셔서 추가해 줍니다.
이때 Copy items into destination group's folder 를 체크하셔서 프로젝트 폴더로 복사가 되도록 합니다.


2. 인터페이스 빌더 실행하기

프로젝트 파일들 중 Resources 의 MainWindow.xib 파일이 인터페이스 빌더(Interface Builder)의 파일입니다.
더블클릭하시면 인터페이스 빌더가 실행됩니다.


3. UI 구현

Interface Builder 가 실행되면 다음과 같은 네개의 창이 보입니다.
Inspector 가 안보이시면 Toos - Inspector 를 선택하여 보이도록 합니다.


UI요소들중 제일먼저 View 를 끌어다 화면 꽉차게 놓습니다. 이 View 가 바탕이 되는 View 이고,
다른 View 들을 담게 됩니다.

그리고, Inspector 창에서 다음과 같이 네번째 탭(identity) 을 보시면 Class 에 UIView라고 적혀있습니다.
이걸 적절한 이름으로 바꿔줍니다. 저의경우는 MainView 라고 하겠습니다.


이제 UIView 를 바탕에 깔았으므로 UI요소들을 넣겠습니다.
sadi 로고를 담기위해 Image view 를 끌어다 놓고 적당한 크기로 조절합니다.


Inspector 창은 왼쪽 창에서 선택된 UI 요소들에 대한 정보를 보여줍니다.
Image View 가 선택된 상태에서 Inspector 의 첫번째 탭 (Attributes)를 눌러 Image 의 목록을 펼쳐
sadi logo 의 png파일을 선택해 줍니다.


이번엔 Label 을 끌어다 놓고 화면 양끝에 적절한 길이로 늘여 배치를 하고 역시 Attribute 에서 가운데정렬로 바꿔줍니다.


이 Label을 더블클릭하면 텍스트를 바꿀 수 있는데, Hello sadi! 라고 입력하겠습니다.


같은 방법으로, Round Rect Button 을 끌어다 화면 아랫쪽에 배치합니다.
세개를 배치하시고, 버튼을 더블클릭하면 버튼의 텍스트를 입력할 수 있는데
CD, PD, FD 라고 각각 입력하겠습니다.


저장 (File-save)하시고, Xcode 로가셔서 Build and Go 를 눌러 실행해 봅니다.


구성한 UI 요소들이 잘 보입니다. 단 버튼들을 눌러도 아무 인터렉션은 없습니다.
지금 우리는 단지 껍데기만 만들어 놓은 것에 불과하니까요.
이제 무언가 인터렉션이 있도록 하려면 그러한 코드를 작성해서 연결을 해주면 되겠죠?

글이 길어져서 2부로 나누었습니다. 다음글로 이동하세요~

Posted by 알 수 없는 사용자